
UberRc Predator Stainless Steel Pipe for Hpi Baja 5b/5T
December 4, 2010 by Baja Planet
Filed under Baja Products & Reviews, New Product Releases

HPI Baja 5SC – Short-Course Truck
December 3, 2010 by Baja Planet
Filed under Available Baja Models, Featured, News
1/5th SCALE SHORT COURSE THRILLS!
Jump into the thrill of Short Course racing with the Baja 5SC truck from HPI! The Baja 5SC takes the HPI Baja line-up to the next level with a new SC-1 body that gives the Baja 5SC authentic Short Course looks. Adding to the durability and realistic looks is a new skid-plate front bumper and a large rear bumper with real rubber mud flaps. Power comes from a massive 26cc Fuelie engine that propels the Baja 5SC to speeds in excess of 40mph and it runs for more than 45 minutes on a single tank of regular unleaded pump gasoline. For extra traction on any dirt surface, HB Rodeoo tires are now standard equipment, mounted on new TR-10 bead-lock truck wheels. We increased durability with Super Heavy Duty 9mm drive shafts, updated rear hub carriers, and HD front hex hubs. A 2.4GHz radio system is standard equipment for precise control and long distance reception without the hassles of frequency crystals. It’s all ready-to-run right out of the box, pre-assembled by our expert crew so you can hit the dirt quickly.
Not sure what ‘Short Course’ is?
Short Course racing is off-road truck racing in an enclosed dirt arena. Filled with jumps, straight sections and tight corners, short course racetracks are just like the RC version of off-road tracks, just imagine them filled with 20 full-size trucks, each with 700hp, scrambling for track position and bashing each other in the turns! You can bump and batter each other but keep the truck on its wheels, thanks to the fully enclosed wheels and tires.
New Baja Short Course Parts
The Baja 5SC is fitted with a wealth of awesome Short Course parts that make it ideal for tackling off-road tracks shoulder-to-shoulder with hordes of other racers. Check ’em out!
New Short Course Body

The wide Short Course body is the first thing you’ll notice about the Baja 5SC: it’s more realistic than the Baja 5T body and it fits completely over the new wheels and tires to let you take corners deep, run the competition wide coming out of the corner and really bang together with other trucks! The Baja 5SC comes pre-painted in your choice of black or bright red, each with color coordinated graphics.

HB Rodeoo Short Course Tires and New TR-10 Wheels
For high traction on a variety of dirt surfaces, HB Rodeoo tires are standard equipment on the Baja 5SC. The asymmetric tread pattern mirrors the design of full-size off-road racing tires. The sticky rubber compound, block treads and wide grooves give the right mix of sliding and gripping. Concentric rings on the sidewalls give extra grip if things get really hairy! Bold new 10 spoke wheels (TR-10) using heavy duty beadlock rings add to the realistic Short Course looks of the Baja 5SC.

New Front & Rear Short Course Bumpers
The final touch in completing the scale look of the Baja 5SC is a new set of bumpers that allow you to give your fellow racers a ‘love tap’ without risking a major incident. The bar-style front and rear bumpers look great and, along with the mud flaps, add that extra bit of Short Course realism!

Updated Rear Hubs
New rear hubs have been added for increased durability and easier adjustment of the toe-in setting. The new hubs are lighter weight and allow toe-in adjustments of 0, 1, 2, 3, and 4 degrees to help match the truck performance to track conditions.

Heavy Duty Front Wheel Hubs
To keep in sync with the new super heavy duty drivetrain, the Baja 5SC also comes with new Heavy Duty front wheel hubs. These new axles utilize a screw and nut design that eliminates the previous use of an e-clip, which furthers the reliability of the truck.

Super Heavy Duty Parts
Because of the ever-increasing power demands of Baja owners around the world, and the constant desire to cram as much power in the Baja chassis as possible, we’ve added all-new SUPER Heavy Duty drivetrain parts that will make sure the Baja 5SC can handle extreme conditions and massive power!
Super Heavy Duty Drive Shafts

All-new extra-thick 9mm dogbones are the starting point of the 5SC drivetrain upgrade – these are new, thicker and stronger to outlast the roughest rides and racing action you can find! New wider rubber boots are included to keep the dirt and mud away.
Super Heavy Duty Diff Shafts

Getting the power from the diff gears to the new dogbones is a wider diff shaft that perfectly fits the increased diameter of the dogbones.
Super Heavy Duty Drive Axles

Getting the power to the wheels are new Super HD drive axles, which fit the thicker dogbones.
BAJA 5SC FEATURES:
FUELIE 26 ENGINE
The powerful Fuelie 26 gasoline engine propels the Baja 5SC to speeds in excess of 40mph. With a dual-element air filter, easy pullstarting and convenient Torx T-27 screws, it’s easy to keep running on standard pump fuel and 2-cycle engine oil. And best of all, you can run for more than 45 minutes on a single tank of gas!

VISCOUS TORQUE DIFF
Unique in the world of large-scale racing, the HPI Viscous Torque Differential gets the power to the rear wheels as smooth as silk. It’s easy to tune with optional diff oils and is fully fitted with hardened metal gears and an alloy case.

ALL METAL GEAR TRANSMISSION
From the input shaft and idler gear to the alloy-encased differential, every gear inside the sturdy Baja 5SC transmission is made from long-life alloy to keep your truck running all day long with minimal maintenance.

8,000 RPM CLUTCH
Standard on the Baja 5SC, this lightweight racing clutch combined with the heavy duty spring gives the 5SC a powerful launch at high RPMs for faster acceleration!

LONG TRAVEL SUSPENSION
The awesome Baja suspension really comes into its own with long-stroke VVC/HD shock absorbers and high-sidewall truck tires, letting the tires do their business whether you’re driving over rutted-out whoops or flying over a big tabletop!

HEAVY DUTY SHOCK ABSORBERS
VVC/HD shocks deliver improved handling over rough terrain and feature large 6mm diameter shock shafts for increased durability. Threaded shock bodies are used for easy adjustment of ride height.

DUAL VENTED DISC BRAKES
Steel/aluminum hybrid brake rotors and semi-metallic brake pads handle braking duties, while a special venting system keeps the brakes cool for consistent stopping power.

LARGE 700cc FUEL TANK
For runtimes of up to 45 minutes, the Baja 5SC fuel tank holds up to 700cc of pre-mixed fuel – that’s over half a liter! And just in case you clip a track barrier and flip over, the tank is equipped with a ‘clunk’ device that allows the engine to continue running even if the truck is resting on its roof.

SFL-11MG SERVO
The hi-torque SFL-11MG servo features extra tough all metal gears for durability, an aluminum steering arm and a water resistant case.

SEALED RADIO BOX
An enclosed radio box keeps water and dirt away from the 2.4GHz receiver and receiver battery. The on/off switch and recharging jack are sealed with soft rubber plugs for additional protection. To keep up with those long runtimes, a high capacity, long lasting, 3000mAh Ni-MH rechargeable receiver pack comes standard from the factory. It comes prewired with a separate charging lead for easy access charging with the included wall charger for that ultimate all-in-one package!

DIRT GUARDS
The Baja 5SC has full-length dirt guards to keep mud, rocks and water out of the main chassis area. The guards continue all the way to the engine and help keep cleaning time to a minimum. And, mud flaps on the rear bumper add to the realistic Short Course appearance.

TF-20 TRANSMITTER and RF-30 RECEIVER
Controlling everything is easy with the HPI 2.4GHz radio system. No need to worry about changing crystals, the radio prevents frequency conflicts automatically. Water-resistant servos control the steering and throttle/brake, with the powerful large-scale SFL-11MG steering the front wheels. If the truck loses radio signal or battery power, an electronic failsafe will bring it to a safe and controlled stop.

Team Chase Bajambug Toy Drive 12.04.2010
November 16, 2010 by Baja Planet
Filed under Baja Racing, Events, Featured, News
Comments Off on Team Chase Bajambug Toy Drive 12.04.2010
Hey guys here is a new event at team chase compound.
Information can be found on HPIracing.com as well as teamchaseonline.com
If any one wants to donate for prize giveaways that would be great and i will add you to the flyer.
We will have races, long jump, lastman standing, dash for cash, and anything else we can come up with.Bajambug Toy Drive
8:00-10:00 Event sign-up, pit set up and open drive.
Please bring your own table, chair, Ez up, drinks, snacks or anything else you may need.
10:00-11:00 Contest entries for :
*Most Festive Baja*
*Most lights on a Baja that work*
*Most Festive Individual*
*Baja enthusiast who traveled the farthest to attend*
11:00- 2:00 Races Begin -ALL cars and trucks race together. 6 trucks/cars at a time. 1st and 2nd place advance from each race.
2:00-3:00 (Surprise Event) This is gonna Great!
4:30 Dinner truck will arrive and set up(Dinner provided by Team Chase)
4:30-5:00 GROUP PICTURE
5:00-6:00 Dinner served Open Drive
5:00-6:30 Fastest Baja Lap time on the Track
6:30-7:00- Sponsor giveaways
TGN Raffle giveaway
7:00-8:00- Big Air Contest
8:00-10: 00 Open Drive
Prizes will be awarded to all event winners.
Toys for Tots is run by the United States Marine Corps. Several Marines will be attending the event to collect toys.
**Please Note** Everyone attending the event, even spectators, must sign an insurance waiver prior to entering the Team Chase Compound. There will be only one entry into the event on the West side of the property. Wristbands will be provided upon registration. Parking for the event will be designated by signs upon arrival . All food and drinks ,with the exception of dinner, is to be “SELF PROVIDED”. The Team Chase Compound is a very rural location and has NO CELL PHONE RECEPTION. We will gladly allow any of our guest to use the house phone and suggest you provide that number to any loved ones who may need to reach you during the event. 1-951-657-1350

Thunder Valley Grand Prix Nov. 6th & 7th.
March 2, 2010 by Baja Planet
Filed under Baja Racing, Events, News
Comments Off on Thunder Valley Grand Prix Nov. 6th & 7th.
Thunder Valley Grand Prix Nov. 6th & 7th. ((( WEATHER PERMITTING )))
There will be two days of racing.

Saturday Nov. 6th will be a 45 minute sprint race under the lights.
Sunday Nov. 7th will be a 2 hour Enduro. Mandatory driver change every 20 minutes.
Trucks race with Trucks
Buggy’s race with Buggy’s
This event will be based on a low point system.
1st Place = 1 point
2nd Place = 2 points
3rd Place = 3 points and so on.
This is a “TEAM EVENT” your team will be scored both days.
only 2 drivers per Team.
Sprint Race format.
Novices race Novices
Experts race Experts
Teams may have any combination of drivers 2 Experts , 2 Novices or 1 Expert & 1 Novice.
If your team consist of 1 Expert & 1 Novice you can earn a low score of 2 points total. Providing your team can post wins in each class.
If you choose to go with 2 Experts or 2 Novices the lowest score possible is 3 points. Providing you finish 1st & 2nd.
Enduro Format.
Teams must choose one vehicle from the previous day that will compete in the enduro. Chosen vehicles will have a small lead seal attached to the chassis. Same seal system used in NASCAR. This is to avoid teams from changing vehicles due to catastrophic failure.
There will be Trophy’s awarded to the top 3 finishers in each Class. Plus an overall Champion Team Trophy.
Motors —- Open
Tires — Trucks must run a Truck Tire.
Buggy’s must run a Buggy Tire.
Fuel Tanks — No extra fuel tanks
ALL VEHICLES MUST RUN A “HPI STOCK CAN” No Modifications, No Headers, No Exceptions
Saturday Nov. 6th
Gates open @ 11:00 am
Practice from 11:00 – 3 pm
First Race 4 pm
Sunday Nov. 7th
First Race 10 am
Entry fee $100.00 per team
If you plan to attend this race please E-mail us at…. [email protected]
Low car count may result in combining of classes. ie. Buggy expert and Buggy novice may run together, same goes for the trucks or cancelation of event.
Overnight camping available for $10.00
If you have a question call or E-Mail me. I will not answer any question on the forums.
If you like to sponsor this event call or E-Mail.
Thanks,
John
(707) 349-7869
E-Mail — [email protected]
DDM Rear Dominator Pipe V2 Install Video
May 28, 2009 by Baja Planet
Filed under Tutorials
New from DDM! Developed through months of extensive in-house testing and prototyping, and custom-designed for maximum RC performance, these new Dominator® V2 pipes for your HPI Baja 5b gas buggy will give you the power you crave. Gives snappy low-end response, yet still offers unmatched top-end performance!
The DDM Dominator® pipe features top-quality steel alloy construction, flexible header coupling, ultra-sturdy adjustable mounting system, and jaw-dropping high polish show chrome finish. Includes FREE custom X-port finned exhaust spacer for improved exhaust header cooling and to help keep the pipe clear of any frame parts! The pipe passes safely through the rear frame “box” – this design is to allow the pipe to be sufficiently wide to allow for MAXIMUM performance, while still being VERY well protected – pipe is unlikely to be exposed in a rollover. Includes genuine Zenoah exhaust gaskets and mounting hardware.
Weight is approx 1.65 pounds. Pipe is covered by lifetime warranty against manufacturing defects from DDM. Fits Zenoah and Chung Yang engines. Fits the stock 23cc “Fuelie” engine on the HPI Baja 5b, and the stock 26cc engine on the Baja 5b SS. Also fits the 5T Truck. Also fits all aftermarket and modified engines.
Available in Black and Chrome
http://www.davesmotors.com/s.nl/c.88…t.A/id.5995/.f
http://www.davesmotors.com/s.nl/c.88…t.A/id.6071/.f
Kick back and enjoy.
Dont forget to order one up if you havent already, its a Worthy upgrade for any Baja be it the SS, RTR, 2.0, or Baja 5T.
| YouTube – DDM Dominator® V2 Pipe Install | |
DDM Dominator® V2 Pipe Review
May 28, 2009 by Baja Planet
Filed under Product Reviews
New from DDM! Developed through months of extensive in-house testing and prototyping, and custom-designed for maximum RC performance, these new Dominator® V2 pipes for your HPI Baja 5b gas buggy will give you the power you crave. Gives snappy low-end response, yet still offers unmatched top-end performance!
The DDM Dominator® pipe features top-quality steel alloy construction, flexible header coupling, ultra-sturdy adjustable mounting system, and jaw-dropping high polish show chrome finish. Includes FREE custom X-port finned exhaust spacer for improved exhaust header cooling and to help keep the pipe clear of any frame parts! The pipe passes safely through the rear frame “box” – this design is to allow the pipe to be sufficiently wide to allow for MAXIMUM performance, while still being VERY well protected – pipe is unlikely to be exposed in a rollover. Includes genuine Zenoah exhaust gaskets and mounting hardware.
Weight is approx 1.65 pounds. Pipe is covered by lifetime warranty against manufacturing defects from DDM. Fits Zenoah and Chung Yang engines. Fits the stock 23cc “Fuelie” engine on the HPI Baja 5b, and the stock 26cc engine on the Baja 5b SS. Also fits the 5T Truck. Also fits all aftermarket and modified engines.
Available in Black and Chrome
http://www.davesmotors.com/s.nl/c.88…t.A/id.5995/.f
http://www.davesmotors.com/s.nl/c.88…t.A/id.6071/.f
| YouTube – DDM Dominator® V2 Pipe Review | |
No Limit R/C world finals at Digger’s Dungeon May 22nd-24th
March 23, 2009 by Baja Planet
Filed under Organized Bashing
Comments Off on No Limit R/C world finals at Digger’s Dungeon May 22nd-24th
The 2009 No Limit R/C world finals at Digger’s Dungeon will be May 22nd-24th in Poplar Branch, NC. This is the biggest RC Monster truck event in the world, held at the largest full size monster truck race shop and home to the famous Gravedigger.
New for 2009 is large scale racing!!
Fast Eddy and many other large scale sponsors will be sending prizes and attending.
Entry fee is $35 per entry and registration open now at: www.nolimitrc.com

Justin
No Limit R/C
www.nolimitrc.com
Live Broadcast!! AutoCross Racing
March 13, 2009 by Baja Planet
Filed under Events
Live web cam works with any browser with the Flash plugin installed.
Please note that all webcams are broadcast live and could have some offensive images and audio. If you might be offended don’t watch. PG-13
Team FastEddy Pro Series HD Baja Stand: Review
February 24, 2009 by Baja Planet
Filed under Product Reviews
Review by: OneHum.
As an RC enthusiast, I am constantly on the lookout for new tools that will help make the hobby more enjoyable. Not having quick access to the right tool or part can turn an enjoyable wrenching experience into one of frustration.
As my collections of cars and tools grow, I have found enjoyment in the pursuit of tools that simply make things easier. I have also found great appreciation for the thoughtful craftsmanship and build quality that go into many of the tools and parts we buy.
One tool that has been talked about frequently here on hpibajaforum.com is the Baja stand. Seemingly simple, quality stands have been hard to come by, forcing many in the community to fabricate stands from PVC, metal or wood. Other alternatives include foot stools, a Home Depot Carpentry stand and, on the extreme end, a very expensive custom swivel arm with custom tray. Quality stands have been in such high demand, in fact, that just about every vendor has been out of stock for months.
There have been two quality stands that are highly regarded in the Baja community. These are the KRD Baja Stand, and the KMAS stand. Both stands are excellent choices, but have not always been available.
I’d like to be the first to introduce to you a new stand that I have recently added to my workbench. That stand is the Team FastEddy Pro Series HD Baja Stand. This stand has replaced my stable of shoe boxes, Amazon.com boxes and a 2×4. It has also replaced my frustration with pure enjoyment.

This stand is excellent in just about every way. It is made of high quality steel with an attractive powder coat that is sure to keep things looking good for years to come.
The specifications for the Team FastEddy Pro Series HD Baja Stand are:
- Weight: 14 lbs
- Base LxW: 22 5/8 x 16
- Tray LxW: 17 7/16 x 12 1/4
- Carriage LxW: 16 x 4 3/16
- Carriage Side Height: 1.5″
- Carriage Height : 7 1/4 – Adjustable to 8″ stock (Upgradeable)
The first thing I noticed about the stand is its strength. When I first had the opportunity to see the prototype, FastEddy stood on the stand and bounced up and down. He then demonstrated how another popular stand would warp with a firm press of the hand. This is something that could cause a stand to become deformed over time. This is something that is not going to happen to the Team FastEddy Pro Series HD Baja Stand.

As expected of any quality stand, the Team FastEddy Baja Stand swivels. Team FastEddy chose to use wing nuts to lock the stand in place, or allow it to swivel freely.


One of the many things I really like about this stand is the parts tray. It is divided into four quadrants, allowing you to organize your parts relative to their place on the vehicle.
The color of the stand was also carefully considered. Unlikely the more popular color of black found on other stands, Team FastEddy opted to use a lighter color. This allows for a high degree of contrast in the parts tray, allowing you to easily find small items.


As expected, the Team FastEddy Pro Series HD Baja Stand does a great job holding onto Bajas. As I continue the build on a Baja 5B SS, and move toward completion on a complete rebuild and upgrade of a Baja 5T, I expect the stand to show it’s utility and it’s strength.


What I was not expecting is how well it holds other vehicles, such as the 1:8 scale HPI Savage X.


If you’re looking for more height out of your Team FastEddy Pro Series HD Baja Stand, a simple upgrade is all it takes. The carriage is supported by a 1″ steel tube. You will easily find 1″ tubing in any length at your local hardware store. This addition, as well as the stand’s effortless disassembly, is sure to come in handy at the track.

Overall, this is a very strong and functional stand with a solid base that is sure to see you through years of wrenching.
Not only have I managed to fill a significant void in my stable of tools, but I have done it with something that has exceeded all of my expectations. If you’re in the market for a new stand for your Baja, you won’t be disappointed with the Team FastEddy Pro Series HD Baja Stand.
I would like to congratulate Team FastEddy on another great product and a fine piece of craftsmanship.
The Team FastEddy Pro Series HD Baja Stand is currently listed at Dave’s Motors and is expected to be available on February 27 for $165.
Please check this and other Baja retailers for availability.


Team FastEddy Baja Stand for the Baja 5B, SS, 5T, 5SC
February 24, 2009 by Baja Planet
Filed under Featured, New Product Releases
After Many months of development we have released our Baja Stand.
It was conceived with the help of Royce Van Bebber from VR Racing. After using all the different stands on the market we boiled it down to include all the feature we found most useful and added several more feature that were lacking in other stands on the market.
The Team FastEddy VR Baja Stand Is a sound investment for any Baja owner.
- Made from 14 gauge cold rolled steel. Its as stout as they come
- Powder coated silver. The lighter color allows you to see parts in the parts tray
- 4 built in parts and tool trays. Built into the base there are no additional parts to assemble. 4 section will help keep things organized.
- Universal top plate. Jut put your Baja on the top. No more having to look and see what direction to point the top and having to find the location tabs like other stands use. Simply just put your rig on the stand.
- Swivel lock. Use the Thumb screws to lock the top plate anywhere along its 360 degrees rotation. You can lock it down or allow it to swivel your choice.
- Add a longer pole to increase the height of your stand. The pole is a standard 1 inch pipe that is easily found at any hardware store. The stand is stable up to 3.5′.
- The design is simple. There are 3 main parts; Base, top, and pole. There are no washers to loose out in the field or bushings to brake or loose. The stand brakes down into 2 components and is easily transported.
- Stand comes fully assembled and ready to use.
Stands are shipping out to the distributors in the morning and will be available on their sites by Feb-27
MSRP:179.00
Expected street price: 159-165.00
HPI Baja Comparison Chart 5B 2.0 – 5B SS – Baja 5T
February 20, 2009 by Baja Planet
Filed under Available Baja Models, Featured
Comparison Chart for the HPI Baja 5B 2.0 – 5B SS – Baja 5T
Information compliments of HPI Europe
|


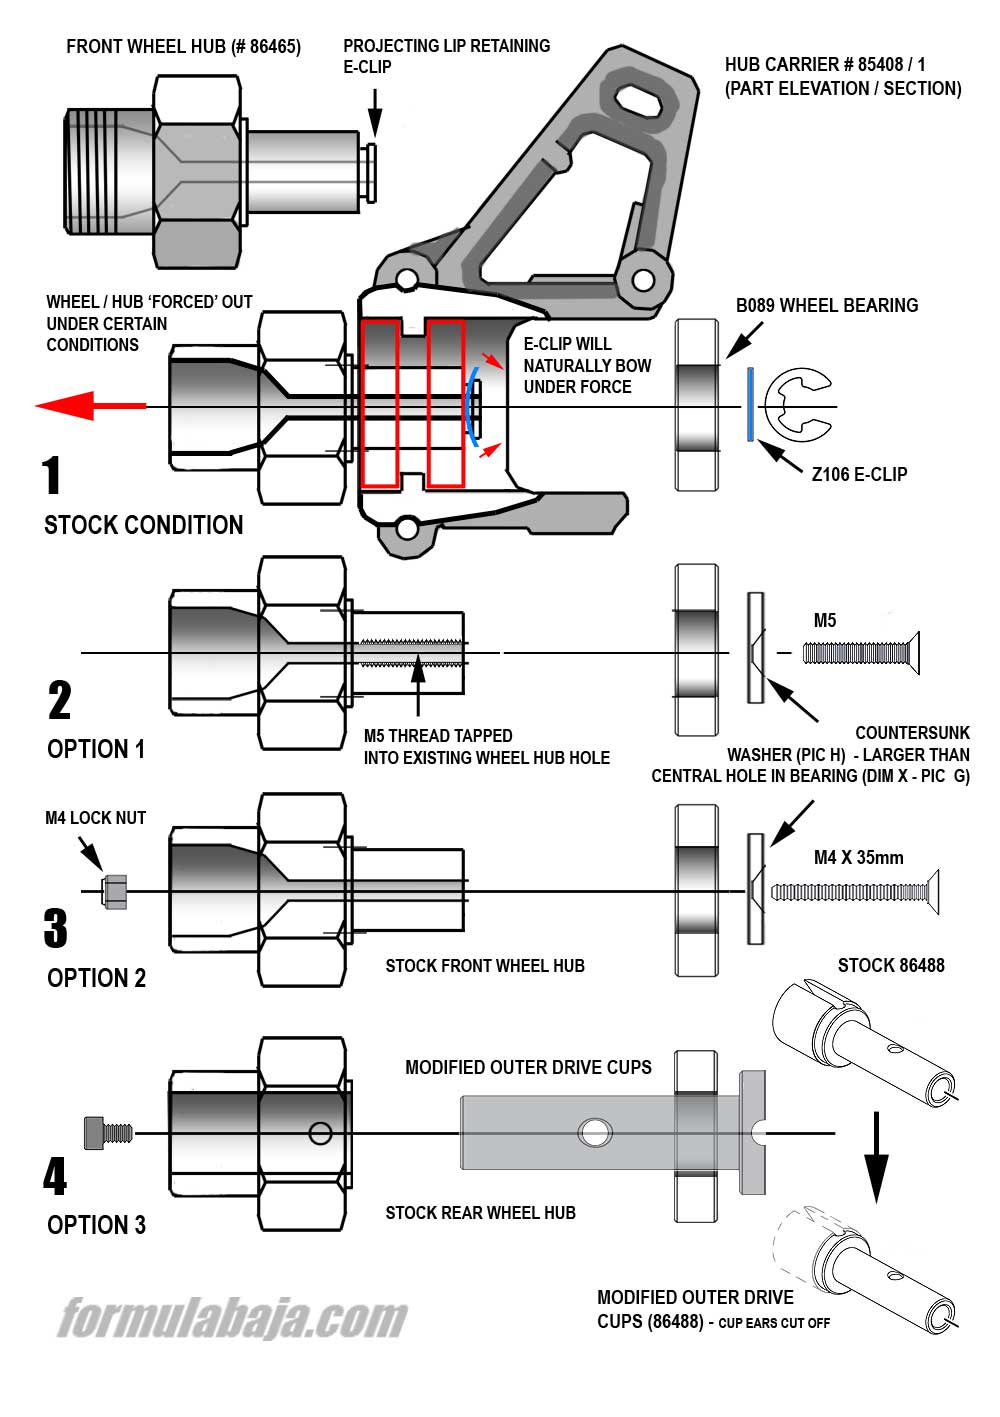
Front wheel hub E-clip modification.
February 18, 2009 by Baja Planet
Filed under Tutorials
| E-clip Modification to front wheel hub | |
|
Tutorial donated by: http://formulabaja.com/
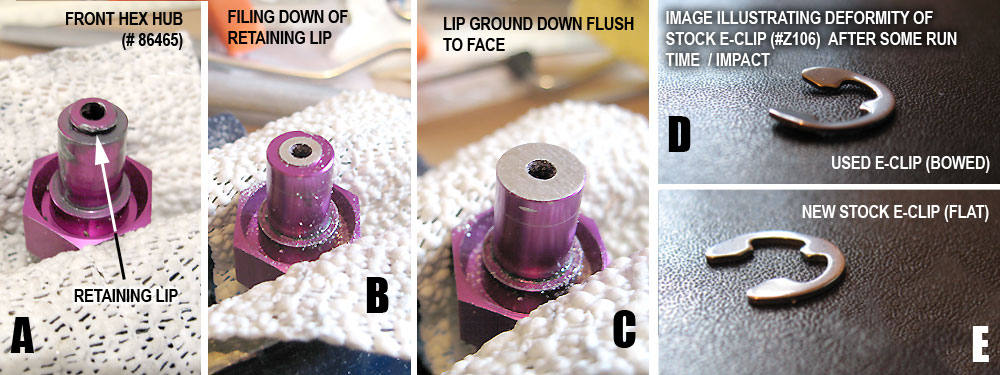
Under certain running conditions, when excessive force is placed upon the front wheel, eg impacts from extreme landings, cornering etc, the e-clip will tend to ‘pop’ off, releasing the front wheel with hub intact (diagram 1 shows stock e-clip connection). The e-clip connection is the ‘weak’ link, designed to reduce stress on other, potentially more vital or expensive parts, in the event of an impact. Over time, being aluminium, the hub retaining lip (pic A) will eventually become damaged and worn (as a result of the steel e-clip), to the point that it may not be able to securely retain the e-clip, resulting in the wheel being released with only the slightest of knocks. Additionally, the e-clip will tend to gradually bow (pic D & diagram 1) after successive runs / impacts, and may go undetected (particularly if any impacts are not sufficient enough to cause the wheel to be released). This can then also result in wheel loss after a light knock. It is therefore important that the e-clips are regularly checked and replaced as necessary as part of a general maintenance routine. Good quality spring steel e-clips will improve the situation. With the understanding of the reasons behind such a connection, an informed decision can be made whether or not to modify the connection, and the potential risks associated. For various reasons, other than those mentioned above, the stock e-clip connection may not be desirable – for example – the need for reassurance that the wheel will stay on under race conditions, to prevent damage to front brake callipers & rotors or billet hub carriers that would have otherwise occurred on wheel loss etc. – or for the simple reason not to forever have to chase wheels and replace e-clips or lost wheel bearings. The following are just two of the numerous options of this simple modification that can be carried out to prevent wheel loss. NB It is understood that by carrying out these mods, and under specific driving conditions, stress will almost certainly be transferred to other parts and connections, and may potentially result in their failure. |
|
 |
|
| Option1 (pic 2, above) – shows an M5 thread tapped into the existing hub hole, following the removal of the projecting retaining lip (pic A, below) | |
 |
|
 |
|
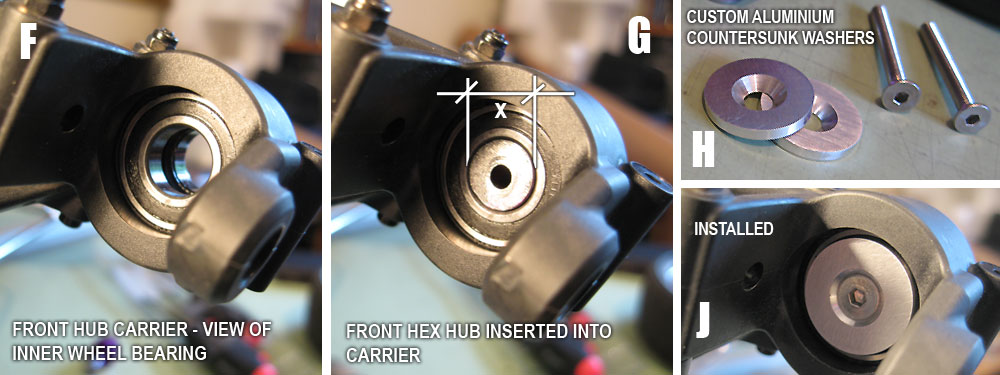
| The above pictures can be used to illustrate both options 1 & 2.
It is important to first check the clearance available between retaining lip and the edge of the ball joint. This dim will vary, and will be instrumental in choosing how to proceed and what fixings will be most suitable. In this example the final projection from the face of the inner bearing, including washer, plus screw head (countersunk, button head or otherwise), could not exceed the original retaining lip projection. Whatever option and fixing method is chosen, it is recommended to check for free movement while using the radio to turn steering at full lock, left and right, simultaneously moving the suspension through its full motion. Aftermarket (billet) front arms* will have different tolerances to those of the stock plastic arms. Some grinding to the ball joint or further modification to the screw / washer assembly may be required. The use of circlips / washers can provide a good midway solution, providing a stronger hub connection, but with ‘release’ in extreme conditions (see further reading).(*If an alloy aftermarket arm is used, It is worth researching that that particular arm has sufficient clearance for full operational movement prior to any e-clip modification) |
|
| Pic H – custom aluminium countersunk washers courtesy – Skaa63 | |
Further Reading – HPIBajaForum thread Front Hex Improvement – Karg HELP!! can’t do eclip mod!! – Scoobysting |
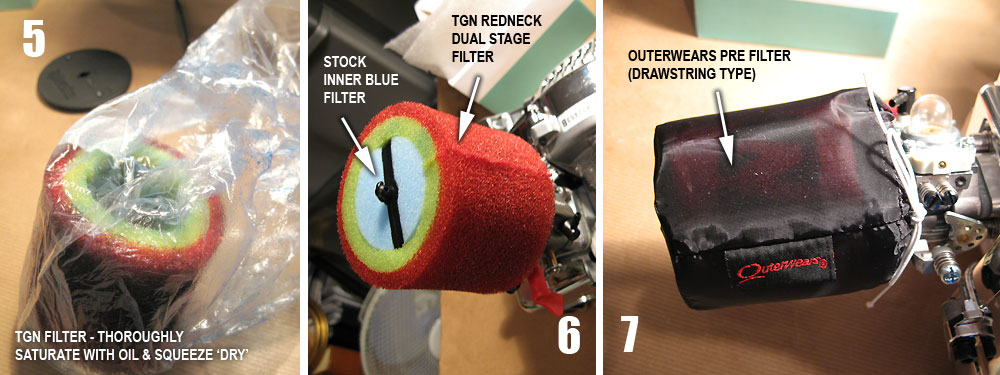
Oiling & Installing the Air Filter
February 18, 2009 by Baja Planet
Filed under Tutorials
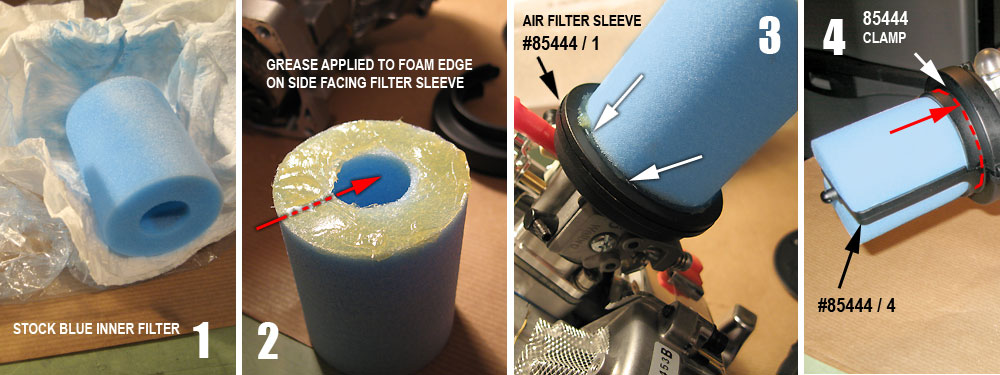
| Oiling & Installing the Air Filter (TGN RedNeck Dual Stage Filter / Stock inner / Outerwears Pre-Filter) | |
| Tutorial donated by: http://formulabaja.com/
Saturate the filter with a tacky foam filter oil. A clear plastic bag or container can be used to literally soak the filter. Disposable vinyl gloves are useful to initially to squeeze as much of the oil back into the container / bag for future use. Then continue to remove as much of the oil by squeezing (not wringing) the filter in paper towels (pic 1) With this method, it can safely be assumed, as far as is possible, that every open cell is coated with the tacky foam filter oil, and every cell is open to pass air. The filter can be over oiled just as easily as under-oiled. Too much oil left on the foam fills the open cells, and will prevent the passage of air, effectively choking the motor. An under oiled filter will breath fine, but can allow dirt into the motor. NB. Protect the filter from water. Water will carry grit through the tacky open cells–air won’t. Clean the filter at intervals depending on use and conditions with mineral spirits or gas, followed up with soap & water. |
|
 |
|
 |
|
| Smear grease onto the air filter sleeve face (#85444 / 1) ie where the foam filter meets the flat of the sleeve (or an even layer onto the end of the stock blue inner foam, as shown here) to effectively form a seal to the ingress of dirt (pic 2 – red arrow, pic 3).After sliding the foam filter to meet the sleeve face, ensure a good seal is obtained against the meeting face (pic 3). Place the two part retaining clamp (#85444 / 2 & 4) and ensure that the foam end sits underneath, and is securely held by the clamp around its full circumference (pic 4)
Take the outer filter element – in this example the stock element has been replaced with the TGN RedNeck Dual Stage Pre Filter (TGN item #3225), and follow the method above for oiling (pic 5). Note – if the outer filter is oiled correctly, it should not result in oil ‘soaking’ the Outerwears fine weave material. To ensure this does not occur, take extra care to ‘dry’ the red outer surface with paper towels. Alternatively oil as much of the inner yellow, keeping the red surface free of oil. If the Outerwears becomes overly contaminated with oil it will attract dust and dirt, preventing the free passage of air to the filter and engine. Note: The RedNeck filter is of a slightly greater diameter than the stock element. As such, ensure that there is enough clearance for the throttle linkage to move freely. Using an Outerwears will reduce the likelihood of this occuring – and a Yamadude type linkage will reduce it even further. Complete the assembly by placing an Outerwears pre filter over the outer TGN filter (pic 6 / 7) |
|
Credits – Earthsurfer Products (ESP), Timmahh |
|
| Further Reading http://www.hpibajaforum.com/forum/showthread.php?t=13079&highlight=oil+filter+grease http://www.hpibajaforum.com/forum/showthread.php?t=24162&highlight=oil+filter+grease |
|
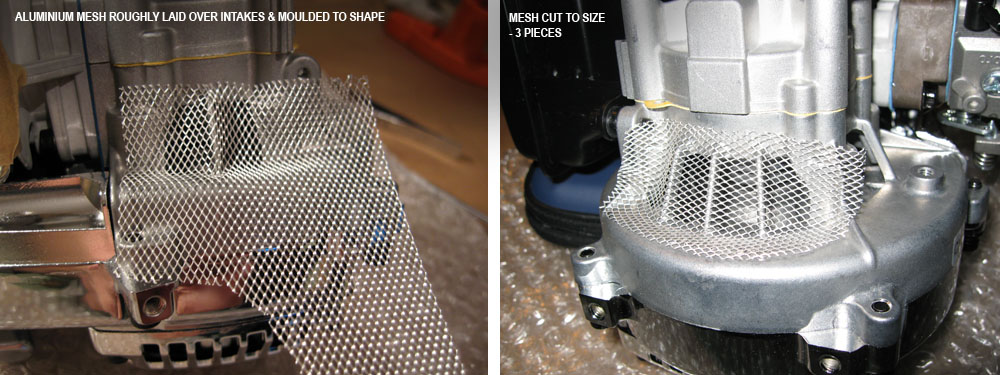
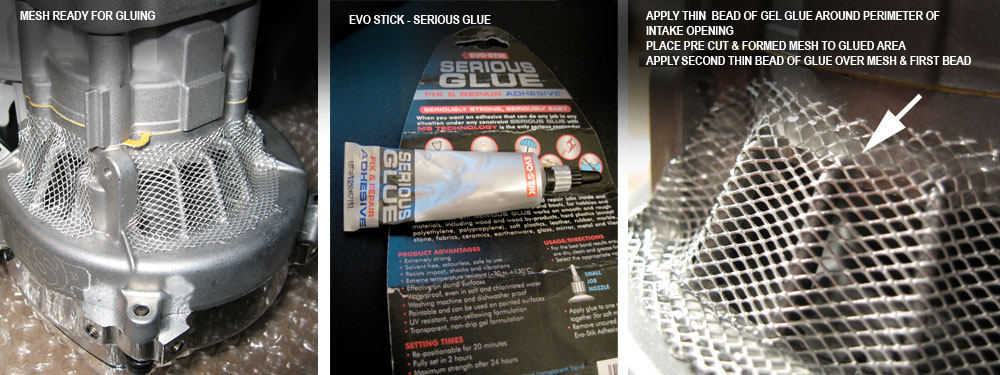
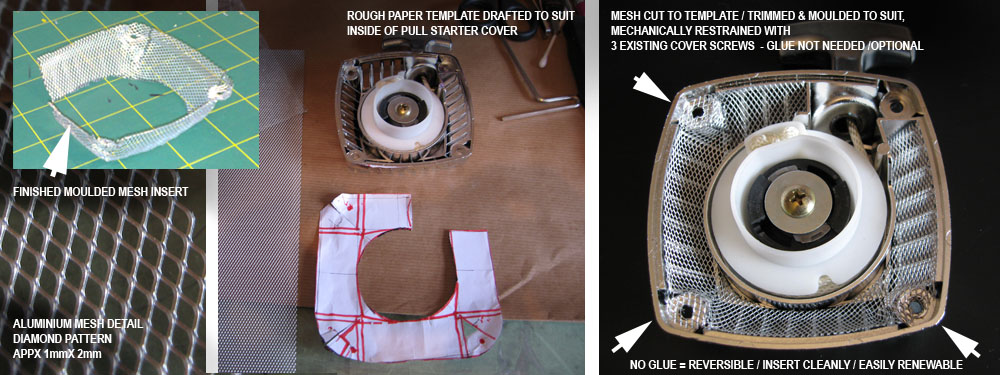
Engine Mesh Mod Tutorial
February 18, 2009 by Baja Planet
Filed under Tutorials
| Addition of mesh to lower engine intakes to prevent debris / stones etc entering flywheel area and damaging fins. You can find a metal screen mesh material at any good hardware store.
Tutorial donated by: http://formulabaja.com/ |
|
 |
|
 |
|
| Mesh addition to pull start grille | |
 |
Sand Running Tips, General Modifications & Notes
February 18, 2009 by Baja Planet
Filed under Tutorials
Recommended Sand Running Upgrades, General Modifications & Notes
These are general options you can use to help protect your Baja when running in the sand. You can do as maney or as few of the segistions you find here. They will all help.
Tutorial donated by: http://formulabaja.com/
- Check all screw fixings and ensure they are all snug, particularly those associated with the exhaust, engine / carb / filter.
- Rear sand paddles, and ideally front sand ribs – mounted up another set of rims so that you’re not forever changing beadlocks.
- TGN RedNeck Dual Stage Filter / Blue stock inner foam both suitably oiled with tacky foam filter oil, with Outerwears pre filter cover (drawstring type may be slightly easier to pull over assembly than the elastic type)
- Outerwears Pull start pre-filter
- Turtle Racing Steel Clutch bell
- Ideally an improved throttle Linkage set up, eg Yamadude style –
- If necessary modifications can be done to the stock throttle linkage – a drill can be used to carefully increase the hole size in the black slider and decrease the chances of sticking due to grit /sand build up. The insertion of two small metal eyelets in the increased holes, one at at each end of the slider, may also improve free movement.
- Grease the carb throttle shaft and place 4 x o-rings P4 (4 x 2mm clear #75070) as used in the shocks, along its length. Grease again, and slip on a trimmed axle boot prior to screwing on the throttle arm. This will protect the shaft and dirt entering behind the e clip.
- Sand will stick to the surface of grease creating a natural barrier and prevent it from entering further and causing potential problems.
- Grease on ‘spring side’ throttle arm (Dieelectric grease, available from marine accessories suppliers etc)
- Shock covers, eg badhorsie.com for protecting the shocks / shafts / prevention of seal wear due to sand abrasion
- Smear grease onto the air filter sleeve face (#85444 / 1) ie where the foam filter meets the flat of the sleeve (or an even layer onto the end of the stock blue inner foam) to effectively form a seal to the ingress of dirt.
- Mesh mod to engine intakes & pull starter grille
- Elcon clutch with a Bashproof plate or similar quality clutches such as Lauterbacher
- Clutch cover – options include, amongst others, Modified RC cover, Billet Enclosed Clutch Drum Carrier with integrated right rear engine mount, Ramtech billet enclosed clutch holder and Modified RC billet clutch cover used with Ramtech billet clutch bell carrier
- Pen spring mod – to caliper pins between brake pad to prevent binding
- Windscreen and side windows, body – first lines of defence, will help deflect much of the sand from your vitals
- Chassis side panels – flexible diy inserts or DTL rocker panels by dliguori25.
- When installing the missing bearing (B029) to the RTR gear case (drive gear shaft), it is probably a good idea to leave the rubber washer #86667(RTR) in place, with the new bearing pushed up against it to seal any gap and keep sand out of the bearing / box
Note that, given the nature of sand bashing (rolling, cartwheeling etc), pipes with baffles removed or short exhaust pipes such as the X-Can will have an increased chance of sand entering the engine and potentially causing serious damage. Of course all pipes will be at some risk to depending on driving style / conditions etc.
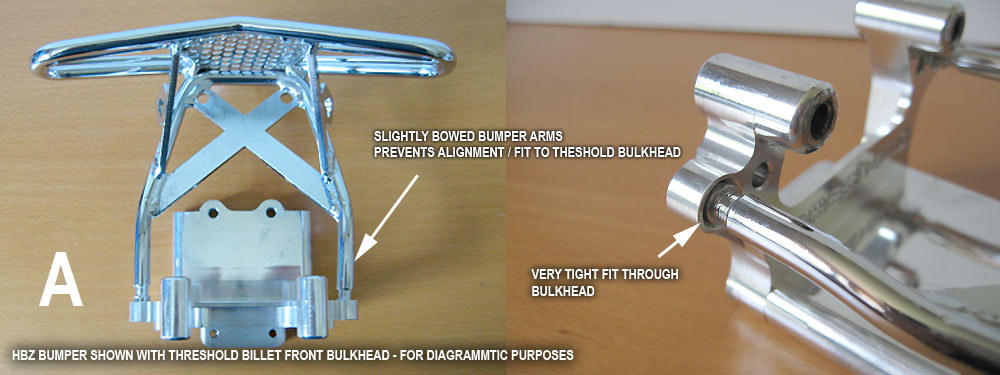
HBZ Front Bumper – Installation / Observations
February 18, 2009 by Baja Planet
Filed under Product Reviews
| HBZ Front Bumper – Installation / Observations
Review by: http://formulabaja.com/ |
|
 |
|
 |
|
 |
|
 |
|
 |
|
|
NB. With a Threshold billet bulkhead installed you may unfortunately find that the HBZ bumper may not fit (pic A) or will be so tight as to potentially cause other issues such as a higher risk of binding in a head on impact, where metal against metal is used. In such a situation damage could also occur to the finely machined billet bulkhead ‘sleeves’ that retain the bumper arms. Reason enough for using the stock BH, in this combination, allowing metal to slide against plastic. The Threshold part is CNC machined, the HBZ bumper is not and hence variances in fit will be inevitable. So to install the HBZ bumper, the Threshold bulkhead had to be removed and replaced with the stock part. NB. Ordinarily, (HBZ bumper use excluded) the Threshold would be my first choice of bulkhead. The front section of the baja was stripped down just enough to get the stock bulkhead back in. It was pretty straightforward from then onwards apart from the sway bar situation. |
|
 |
|
 |
|
|
No sway bar, probably no problem. Bearing in mind that these HBZ bumpers will inevitably vary one to the other – this is just one installation experience. The captive lock nut in the top sway bar clamp prevented the flat cross brace in the HBZ bumper from interlocking with the underguard (skidplate) screw postions. See pic.B Probably important as these two screws which fit into the skid plate ‘plugs’ are the main fixing for the front of the bumper. The rear ‘arms’ of the bumper being retained through the bulkhead with plastic c-clips. The nuts were ground down (pic C) to allow the cross brace / bumper to fit flush immediately above the clamps. This allowed the screw plugs to now slot into the HBZ holes. |
|
|
Just as a side note, the Lunatik bumper is more of a rigid type being anchored top and screwed bottom. The HBZ one is only fixed at the top with two screws into the top of the skidplate of the stock bumper set. From initial observations it would seem that this would have a bit more flex in a head-on hit, for the above fixing reasons. Probably a good thing. That is to say, the stock skidplate / front bumper assembly – (#85420/3) is designed to have some flex in it. Admittedly not enough to save the chassis from a bad crash, but some nonetheless. The arms of 85420/1 which thread through the upright part of the bulkhead, and are restrained by the c-clips (85420/8 ) will also have some horizontal movement. There are a few good bumper options out there and certainly room for more. I think a comprehensive bumper design with some sort of spring steel plate / crumple zone behind or integrated with the skidplate would not be a bad thing (in conjunction with Diegos bottom plate / TRs top plate) – My only other comments are re the layout of the perforated mesh – IMO should have been symmetrically laid, horizontally or vertically, rather than random.Also watch out for any rear side sharp edges on the mesh, may want to file them down carefully. |
|
| I | |
| Original forum thread and comments detailed at http://www.hpibajaforum.com/forum/showthread.php?t=30411 |
RPM Suspension Arm FAQ
February 12, 2009 by Baja Planet
Filed under F.A.Qs
Comments Off on RPM Suspension Arm FAQ
The amount of questions that get asked about the RPM arms is really amazing.
Written by: tetsulo
General Information
- One set is will do one side of a vehicle (Front or Rear)There is no difference between right or left.
- To completely outfit a vehicle you need to order two sets of fronts and two sets of rear’s.
- The RPM Part #’s 82251 (Rear White) and 82141 (Front white) can be died using RIT Fabric Dye or equivalent.
RPM REARS
- Some peoples rear arms line up fine, other peoples don’t.
- When they don’t line up they seem to be commonly about 1/8″ off and put stress on the turnbuckle, ball end and rear upright.
- Regardless of the alignment issue, the new arms are much stiffer and cause aftermarket and factory turnbuckles to snap — often leaving a portion threaded in the upper a arm. Easiest way to remove is use a dremel cutting wheel and notch the broken piece enough to allow a flat head screwdriver to remove it.
- People are making spacers using aluminum or steel tubing and nuts, or threaded aluminum tube to spread the load across the faces of the upper a arm and ball end. I have seen aluminum tubing up to 1/2″ in diameter. People doing these mods seem to be posting positive results. (12mm is factory camber settings)
RPM FRONTS
- I haven’t seen one bad review or comment about fitment or performance.
- Lots of E-Clip eliminator mods don’t work properly cause the material around the lower ball is thicker. Basically you have to remove the E Clip ring to free up enough space to get something to work OR you have file down the head of the bolt.
- The upper arms eliminate the plastic C-Clip — this means that mods like using an additional factory brace at the back of the bulkhead doesn’t work without shaving down either the bulkhead or the suspension arms. I believe this is also the reason why the Modifier front lights don’t work — but I don’t own them so I can’t confirm.
Pictures of the brace mod and arm mod can be found here:
http://www.hpibajaforum.com/forum/sh…ht=rpm+tetsulo
Carb tuning instructions and guidelines (By Doug @ ESP)
February 8, 2009 by Baja Planet
Filed under Tutorials
Comments Off on Carb tuning instructions and guidelines (By Doug @ ESP)
With more people coming into the RC engine, so does the amount of lean seizures. I rewrote my old instructions to what I think is easier to understand. There are other methods people use, but knowing how fast a lean RC engine can seize at higher RPM, I can’t think of a safer, in the field, way of tuning the H jet for that day.
CARB TUNING FOR GAS RC ENGINES
Thank you for buying A ESP engine. This is a guide only. ESP will not be responsible for failures unless it is the fault of ESP workmanship.
Keep in mind that the low speed carb jet screw flows fuel from zero to about 1/3rd throttle opening. The high speed jets starts flowing from about 1/3rd throttle open to full throttle. Both jets flow fuel above 1/3rd throttle.
Set the high speed jet at 2 turns out from bottom to start. Set the low speed jet at about 1&½ turns out and set the idle up for easier first time starting. Warm the engine on the stand for a few min, rev the engine on the stand a bit while rough setting the low speed jet and idle, for idle to rev throttle response. Close the low speed too far, and the idle goes up and starts vibrating from a lean condition. Open the low to far and the engine will run rich and die. Stay on the rich side, but make sure throttle response from idle is good. Typically, you will end up with a L jet at 1&1/8th to 1&1/2 out. Continue to rev the engine for a few minutes above half throttle, but not holding it in any one position, to run the engine with the high speed jet flowing. Shut it down, and check the plug color. The plug should be a dark color like a dark brown or black. The rich settings we start with could possibly foul a spark plug, so you might want to have a new plug or two on hand for tuning. This dark plug color is good for now, it means we are getting plenty of fuel–at least on the stand.
The H speed jet is critical, and a RC engine can seize in seconds if the fuel/air mixture is lean at high rpm. Because of this, we creep up on high rpm one run at a time, checking the plug for each higher RPM run.
- With the H speed screw out 2 full turns, run the buggy 30 seconds at a time at about 8,000 to 9,000 rpm (or where your clutch is just engaged). Keep running the buggy at the low RPM until the plug starts building up some dark color. We will need deposit built up on the plug to burn off for “reading the plug”, when we start leaning out the carb H jet later.
- The plug should stay dark for the rest of this test, until we start adjusting the H screw more lean after we get to full throttle tests. We are now going to raise RPM approx 1000 rpm for 30 seconds for each run, and check the plug after each run to make sure it is still dark. You should have about 10 increments of 1000 rpm from clutch engagement, to full throttle, but the more increments you use, (less RPM rise for each run), the safer you will be. If, while your doing the runs, and getting higher in the rpm, you start seeing the deposit burning off the plug to a brown or lighter color, you have a problem with your fuel system (bad carb, fuel filters, fuel lines) or a possible air leak that you have to fix before you can continue. You may have just saved your engine from a lean seizure.
- When you get to 30 sec full throttle runs with a dark plug, now it is time to start leaning out the H jet. After a full throttle run, check the plug, and it should still be dark with the H screw 2 full turns out. Turn in the screw 1/16th at a time, and continue doing full throttle runs, plug checks, and H screw carb adjustments, until the plug is a brown paper bag color. Do one or two full throttle runs to make sure the plug does not get any lighter. Then fine tune the low speed jet for the best hole shot, and your done. It is a good idea to write down the amount of turns you are at when done, for a reference.
Note, many carb bolts are too long. If your long carb bolts (that hold on the filter, and go through the carb, into the intake manifold), reach all the way through your intake manifold, you will have to shorten the bolts, or risk a damaged cylinder and air leak, possibly seizing the engine.
To help insure you don’t seize your engine due to a carb failure or clogged fuel filters, etc (something other than your set screws), it is a good idea to do a few increments and plug checks every time you take out the machine. Jet richer on cold days, and always re jet for any modification you may make. There is no such thing as “stock settings”, jet it yourself from scratch, or risk seizing the engine.
Doug @ ESP
(616) 458-8103 (Eastern standard time zone) [email protected]
What should my first Hop-Ups be?
February 8, 2009 by Baja Planet
Filed under F.A.Qs
Now that you have a Baja, it doesn’t mater what model you are probably wanting to get some hop-ups for it. Its only natural to want to personalize your new rig. There are a few items that we believe to be “Must Have” Items. They aren’t “Bling” items but are items that will help protect your Baja and insure that it will withstand the test of time.
Must have items:
- Outerwears Pill start cover
- Outerwears Air filter cover
- Fuel filter.
- Ratio Rite measuring cup
Optional Items but worth looking at for your first purchases:
- Axel Extenders
- Clutch / wheel shims
- Clutch carrier
Pull start and Airfilter covers will keep the dust, sand, grass, and dirt out of the covered parts. Dirt in the carb is the #1 reason for engine failure. The pull start will fail quickly is not properly protected. If nothing else get these two items. It will be the best money spent.
An external fuel filter will keep the crud out of your engine. The Baja has an internal “Clunk” style filter but it doesn’t always catch everything. This is a cheap and easy part to get and will again, help insure that you are protected. When you go to get one, make sure it specifically states that its for GASOLINE.
A Measuring cup designed for mixing fuel and oil will help make sure you are getting the proper mixture. Performance issues and blown engines can the result of errors in mixing your fuel and oil.
Axel extenders will help stabilize your new ride. If your driving style finds you on your lid often, look into a set of extenders. You will be amazed at the big difference they make. Several companies offer them. The most popular ones are made by DarkSoul Racing but there are several other companies to choose from.
Clutch and wheel shims are a needed item. From the factory or during your build you will notice a lot of in and out play in your wheel hubs. Installing the proper thickness shims will get rid of this “Slop” In return, your bearings will last longer and you will reduce C-Clip failure on the front hubs. The stock clutch bell has a lot of “Slop In it. Shimming the bell will reduce all sorts of slop related issues. The same shim size is used in both places. HPI offers the proper size shim in one thickness and Team FastEddy offers a Shim Kit that includes several different thicknesses to get everything just right.
The stock clutch carrier will be fine for a while. Its made of plastic and can quickly distort from the heat and torque. This will cause many issues down the line including melted spur gears, broken pinion bolts, and quickly trashed bearings. An alloy holder is a great solution to this. HPI had their “HD” carrier that includes larger bearings, Turtle Racing has an enclosed HD Clutch System that is close to bullet proof. There are others on the market as well, Do some research and choose one that you like.
Once you have these “Essential” items covered its time to go have some fun and know that you have made you rig more “Solid” and dependable.
Australia Dune video From: Monkeymagic
February 8, 2009 by Baja Planet
Filed under Baja Videos
Comments Off on Australia Dune video From: Monkeymagic
RCX Photos 2008
February 7, 2009 by Baja Planet
Filed under Baja Photos, Other RC & Motor Sports Events


Baja 5T Hill Climb By Rallyette
February 6, 2009 by Baja Planet
Filed under Baja Videos
Backflip Directors Cut by Rallyette
February 6, 2009 by Baja Planet
Filed under Baja Videos
Comments Off on Backflip Directors Cut by Rallyette
Baja Cross By Rallyette
February 6, 2009 by Baja Planet
Filed under Baja Videos
Comments Off on Baja Cross By Rallyette
Phat Track BajaCross from Protecta Pictures on Vimeo.
RAMS Club Baja Auto Cross (Nor-Cal) Track info
February 6, 2009 by Baja Planet
Filed under Baja Racing
Comments Off on RAMS Club Baja Auto Cross (Nor-Cal) Track info

2009 Schedule:
- February 15th:
- March 15th
- April 19th
- May 17th
- June 7th
- July 19th
- August 16th
- September 2Oth
- October l8th
- RAMS 5th scale will add Autocross as a points event. This will be an open class so everyone can race what they have (within reason). We will have some restrictions on noise (mufflers and we do have a sound meter) and safety items (bumpers for example). Since this is a member driven class, changes can be made as needed. Ted and Frank will be the main people for this class.
- We normally race on the 3rd Sunday. Feb is a warm up race (no points) and March to Oct are points races (8 with 2 throw-outs).
- The only exception is June where we move to the 1st Sunday due to Father’s Day. If we get rained out, we will try to reschedule.
- Practice shall be: 10 minutes Autocross, 10 minutes STC/F1, 20 minutes Autocross, and 20 minutes STC/F1
- Qualifying is two rounds of 10 minute racing. We will try to keep the number of cars to less than 7 for the qualifying.
- Mains will be 20 minutes in the beginning, we will let the group decide if a 30 minute main is better as the season progresses. Normally a 10 car field with one bump-up from the earlier race.
- Continue to use MMR Track Grip
- RAMS is a non-profit corporation that strives to break even each year. We have to pay for: the college each time we set foot on the parking lot, trailer parking, repair and painting the boards, stuff we spray on the ground… So what money we do collect goes to the race program. In addition we count on the membership contributing their time and energy to make the racing fun, competitive, and exciting for everyone.
5th scale race fees for 2009
- RAMS membership is $30 (for the 2009 race season)
- ROAR membership is $30 (1 year for joining)
- Member Race fee from $20 to $25
- Non-member race fee from $25 to $30
- NATC from $30 to $35
- No second class fee (encourage drivers to drive more)

HPI Baja 2.0
February 5, 2009 by Baja Planet
Filed under Available Baja Models, News

After all that, you’ll understand that when it comes to updating such a legendary car, you can’t mess with the magic too much: we wanted to give our fans more of the same, without going overboard. It was a tricky subject, but we’re sure we got it right on the money.


 |
|||
 |
 |
 |
|

The tough bodyshell is now available in three all-new paint schemes: subdued gray, hot red and cool blue! These are pre-painted, pre-trimmed bodies that are ready to go right out of the box: no prep work needed! With their 2mm thick polycarbonate moulded construction they will last for a very long time!

The new engine fitted in the Baja 5B 2.0 features an updated cylinder that provides 10% extra power! When combined with the High Flow Muffler and 8000 RPM clutch, you’ll experience much faster top speeds, better acceleration and more power overall!

The High Flow Muffler from the Baja 5T is a much larger capacity design than the old standard muffler, and is tuned to give you more horsepower on the track. It sounds fantastic, too! When the Baja 5B 2.0 is ripping past the pits, you will know it!

Formerly an option part, the high performance 8000 RPM Clutch from the Baja SS and 5T is used to give you more punch off the line. Lightweight clutch shoes and a strong heavy-duty spring are the integral parts of this unit, and you will feel the power out of the turns.

These are the same damper units that equip the Baja SS and Baja 5T, and are now standard parts for the 5B 2.0 – these are oil-filled, externally adjustable coilover shocks for fantastic performance and heavy-duty action! Thick shock shafts provide security from crashes, threaded shock bodies allow instant ride height changes, and the externally adjustable design is tailor-made for trackside tuning.

The engine now features tough Torx T27 screws to make maintenance and rebuilds less of a chore. Torx screws are easier to work with and provide less wear and tear on tools and screws, making them the ideal screw option for a Baja buggy engine!

The v2.0 update includes a total reworking of all the aluminum parts of the Baja buggy, from the chassis to the spring adjust collars! The very cool gunmetal look gives the Baja 5B 2.0 the ‘race’ look, and it’s easy to add a bit of bling with Baja SS or original 5B colour parts.

Topping off the gunmetal monocoque chassis are the new pre-painted bodyshells provided with the Baja 5B 2.0 – choose from three new main colours: a racy red, awesome blue or stealthy gray! Each design is totally new and unique, and would cost you a fortune if you were to get it custom-painted on a clear bodyshell! Hit the track or your bashing field in style!
 |
|||
 |
 |
 |
|


From the first glance, the Baja buggy looks just like the sand rails and desert racers you can see racing across the Sonora in Baja California, or blasting around the sands dunes of the American Southwest. Nothing else in the RC world comes close! From the bumper and front suspension, to the cockpit and rollcage, all the way to the wing and rear bumper, in the looks department, the HPI Baja is second to none.

HPI has always been known for its extremely rugged cars and trucks, starting with our earliest touring cars and carrying on with monster trucks and large-scale machines. The Baja 5B 2.0 uses the same suspension components as the Baja SS and 5T, so you know you’ve got a quality buggy in your hands. While the ones that came after the original Baja use cheap plastics and questionable methods to make their kits, the original is still going strong with original designs and compounds to keep you going, no matter what you put your Baja through!

Still a unique item among the large-scale racing crowd, the Baja 5B 2.0 continues to use the unique Baja monocoque aluminum chassis. The chassis formed from strong 6061 aircraft aluminum for light weight and strength, then bent into shape with computer precision to make it into an extra-rigid and super-strong platform for the engine, suspension and all other components of the Baja.

For confidence-inspiring traction and control on any type of surface, the Baja 5B 2.0 uses the amazing long-travel suspension used for all the kits in the Baja series. Extra-long oil-filled shock absorbers and durable suspension arms connect via a specially tuned suspension geometry to give not only a fantastic look and style to the Baja buggy, but amazing versatility, tuning potential and great handling!

The totally unique Viscous Torque Diff in the Baja series delivers power smoothly to the rear wheels. It’s set up out of the box perfect for most purposes already, but the diff can be tuned with different diff greases to suit any driving style or track. Hardened metal is used throughout the diff for reliable performance in all conditions.

To bring something the size and speed of the Baja buggy to a safe and controlled stop, the brakes need to be extra-strong, reliable and foolproof. This is why we use two steel plates for brake discs, both of which are drilled for lightness. To keep the discs cool under pressure, a fan-shaped spacer is used blast rotating air through the vent holes drilled in each disc.

In addition to everything else that makes the Baja 5B 2.0 handle great, its long wheelbase is ideal for racing on large tracks designed for 1/5th scale vehicles, or just playing in big fields. The Baja 5B 2.0 is more stable over jumps and rough ground than other large-scale cars, a tribute to its great suspension design and longer wheelbase.
The electronics included in every Baja RTR buggy and truck have to be suitable to the task of handling a car nearly a meter long that can go over 35 MPH – that includes a handy built-in electronic failsafe to prevent a runaway Baja! To control the Baja 5B 2.0, we’re sticking with the reliable HPI TF-10 radio set, which uses FM frequencies instead of the more common and cheaper AM radio system. Tough water-resistant servos control both the steering and throttle, and a special large-scale SFL-10 servo is used for the steering. A powerful sub-C type 6-volt receiver pack powers the servos for confidence and longevity. You’ll find that many Baja bashers don’t find a need to upgrade the radio system, as it’s already perfect for the task!

Nitro racers have known for a long time that having a working failsafe system is important for those ‘just in case’ moments – some unforeseen event that could make their car go out of control. With a buggy as big as the Baja (over 800mm long and 9.5kg in weight!), this is even more important! The Baja 5B 2.0 uses the same reliable electronic failsafe as all other Baja RTR kits. The adjustable failsafe setting ensures that should your Baja 5B 2.0 lose radio signal, instead of flying out of control it will come to a safe and controlled stop! There’s nothing like peace of mind!

To allow the Baja buggies to go anywhere, we fit tires that are ideally suited for off-road conditions. Spiked rear tires and dash-style front tires provide the perfect amount of traction and control on nearly all dirt, gravel and grass surfaces. The Dirt Buster S Compound rear tires use a versatile square pin design that sheds mud and gets you the grip you need for massive top speed runs, while the Dirt Buster rib tires provide the direction and steering necessary for pinpoint accuracy on the track.

We know that most off-roaders love to blast through dirt, mud, water and more, so we protect the electronics of the Baja as much as possible with a sealed radio box. In addition to being under the bodyshell to protect from splashes, the radio box uses rubber plugs to provide access to the receiver battery and radio crystal, so you don’t need to unscrew anything to get to these often-accessed items. If you do need to remove it, it’s a simple matter of a few clips to take it out – no tools necessary!

The fuel tank from the Baja 5B and 5T is unchanged – why update something that is already perfect? The 700cc fuel tank takes pre-mixed 2-stroke fuel for run times of 45 minutes or more (if you’re going slow, but who does that?), and the handy ‘clunk’ inside allows you to get upside down and not worry about the engine cutting out. So when you’re mixing it up in traffic on the race track you won’t have to worry about getting flipped upside down!

For most Baja buggy owners, the rear wing is something that is never touched until the car needs to be picked up or flipped over. Racers, though, are a different matter: racers like to tune things and play around with settings to get a little extra edge. So for the racers, we made the rear wing of the Baja adjustable so you can get a bit of extra downforce on small tracks, or lower the wing a bit for more speed on big tracks. Will you feel the difference? Only you’ll be able to tell!

With tough nylon plastic skid plates front and rear, the chassis of the Baja 5B 2.0 is protected from the inevitable hard landings, crashes and more that you’re sure to encounter while you’re running your Baja buggy. The skid plates are easily replaced, and are a much cheaper alternative than replacing the aluminum chassis or motor plate, so you won’t be afraid to pull off those crazy jumps with your Baja!

Finally, full set of high-quality ball bearings are used throughout the drivetrain for increased efficiency and long runtimes. Throughout the transmission and drivetrain, plus the front wheel hubs, ball bearings help keep maintenance to a minimum so you can just get out and run your Baja!

HPI makes it so easy for beginners to get into 1/5 scale! Just open the box, charge up the battery, add pre-mixed fuel and go! The Baja 5B 2.0 is completely pre-built and ready to go right out of the box! Everything is assembled and tuned for you by professionals – engine connections, shocks and more are perfect before you even open the kit so you don’t have to do a thing to get going fast!
HPI Ready-To-Run models bring you the same high performance and quality that you’d expect from a high end model car kit but with the added convenience of being factory pre-assembled to the highest standards – giving you a high performance RC car straight from the box! HPI RTR cars are 98% factory assembled – they come Ready-To-Run and equipped with all the radio gear required. Just a few steps are needed to get your car up and running, such as adding the batteries to the transmitter and receiver and if you have a nitro powered car, running in the engine – which is now even easier with our comprehensive manual and HPI RC cars DVD which are both included in every box.

As with all HPI cars and trucks, you get a full, in depth instruction manual with step by step instructions that allow you to easily disassemble and reassemble your truck for maintenance and easy servicing. The information on the HPI RC Cars DVD provides a complete and detailed introduction to the fascinating world of HPI RC model cars and trucks. This DVD will show you step by step how to start and run in a nitro engine, plus how to get the best performance from your HPI RC car. The HPI RC Car DVD is your personal RC car expert in a box!

Pre-Assembled 1/5th scale 2WD buggy with Fuelie 23cc gasoline engine, FM radio system, 3300mAh receiver pack and painted body. Receiver pack charger not included. Includes comprehensive instructions manual and HPI RC Cars DVD.

Photos of HPI Baja SS Kits being built. (Submitted by members.)
February 5, 2009 by Baja Planet
Filed under Baja Photos, Featured
Photos submitted by people just like you that are in the process of building their HPI Baja SS Kits.
Check it out. If this doesn’t motivate you to go get one, nothing will.


Build the Baja SS from Start to finish (100 segment video series)
February 4, 2009 by Baja Planet
Filed under Building the SS Start to finish., Tutorials
Team FastEddy has filmed a complete building of the Bajs SS from beginning to end.
This 100 segment video manual will offer you not only a step by step guide to building your Baja SS but also offers you a huge amount of tips and tricks to help inspire the best possible build and building experience.
It is laid out in 100 segments each being from 5-10 minutes in length. Follow along step by step or search for a page number and watch the video if you get stuck and need help.
CLICK HERE to take you to the series.
Comments from people that have watched the video series:
Hi TeamFastEddy,
These vids are very clear and were great when some of the instructions didn’t quite
make sense in my build. Thanks alot!
Not sure who does Your videos for hpibajatutorials.com I’d like to tell
them I think there great …….there perfect!!!!!!! I have been doing this
hobby 30years 20 in retail and it was even helpful to me….. If this was
sent to wrong place please forward it as person deserves to get this emailThanks owner of
Cruizin with r/c’s
Ron Bosco
I just purchased my first baja SS and Ive been watching your tutorial vids and I must say your doing an excellent job! very informative, very clear to understand, A+++……
I whould like to thank you for nearly 100 part “Building The HPI Baja SS Tutorial” Series ! Withouot the tutorial the baja whould be a lot harder to build. I have just finished my baja and i was working on it just 2 days thanks to your tutorial !
Best regards
Jakub
I would like to thank you for nearly 100 part “Building The HPI Baja SS Tutorial” Series ! Withouot the tutorial the baja whould be a lot harder to build. I have just finished my baja and i was working on it just 2 days thanks to your tutorial !
Awesome videos… I am almost done my ss build and this series has been most helpful when HPIs manual was not 100% clear. Keep it up
OMG!!! arnt u bored of making videos?????? But thanks for making all your videos they were bloody awesome!!!!! watch (madigan8hosking) Thanks bro ur a chiller
LOL Eddy you crack me up sometimes. “Its mandatory that you drop the pin on the floor” Keep up the awesome work on the tutorial videos.
Next step: EXHAUST PIPE heheheheh wiiii. The truth is that these doing a marvellous work, and you still have the car fantastic. I see the videoes from the beginnings heheheh, from the presentation of the box of the baja 5b ss and every day I look if you have put some video more. For you, it has to of getting mad to be doing little by little the car, because it’s really funny build the baja littles by little. A greeting, and spirit!!
Continue makin videos!!you are great!!excellent videos, very simple to understand step by step!!!
All I can say is Thank You…Im a 61 year old farmer from Iowa and I did the SS in the 18 hour range. thanks for taking it rather slow at times,is was needed…again Thank you XXXX Webster City Iowa……….Go Fast Turn Left
Cheers and thanks for these videos, I’m loading them onto my iphone so
I can build this thing without a laptop next to me.
Fast Eddy Sets a standard in my book A+++
I just wanted to thank Fast Eddy. What an outstanding guy who sets a standard. I hold myself to pretty high standards IMO and Eddy showed me one better. We ran together with close to 20 other guys, and we all had problems breaking etc, and Eddy was there to help each and everyone one of us. I just wanted let Eddy know how much I appreciated his help (and parts ..lol) You are one of the most helpful persons I have met in this hobby to date! Corey Rpp Hobby
Posted by adamhc
I finally finished my 5b ss build. The videos were a very much needed repository of information.
Purchase Baja Products
February 3, 2009 by Baja Planet
Filed under News
US based resellers of HPI Baja products


")
Europe based resellers:
 Resellers: If you would like your company listed, Please contact Baja Planet.
3rd channel servo mount for the Baja 5B & 5T (Baja Skunkworks)
February 3, 2009 by Baja Planet
Filed under Featured, New Product Releases, News
This is something that was developed a couple years ago, and we finally had some time to bring it to fruition. This is a third channel servo mount. It is specifically designed for use with front brakes giving you the ultimate setup for racing. However you can use it for whatever option you can come up with for your baja.
This mount will work with both the 5T and the 5B. On the 5B you will need to trim the body back some.
The servo mount is adjustable so that it will work with most any of the standard sized servos out there. Also, the bracket has two servo mounting configurations depending on your setup
This will clear most side mount pipes. However you may need to modify the pipe mounts. I know on the DDM sidemount you need to trim the back mid pipe bracket
The bracket is a 1/4″ thick and doubles as an HD motor chassis bracket.
These are shipping out to TGN and DDM this week. MSRP is $50 and includes servo mounting hardware


Here is the mount with a Jetpro Pipe on my 5T

Installing the Turtle Racing Diff Saver and HD Drive cups.
February 3, 2009 by Baja Planet
Filed under Tutorials
Beefing up the rear drive train of your HPI Baja 5B is a necessary upgrade once you decide to increase the Horsepower over the stock engine. There has been many issues of the diff case warping, flexing, and separating due to the additional torque created by the massive horsepower of upgraded engines and pipes. Along with this issue, the dog bones need to be upgraded due to twisting, the drive cups and diff shafts will also start to flex and bend at the ends.
Turtle racing has addressed theses issues with two separate packages. This tutorial will cover the installation of both kits as well as the installation of the “Missing Bearing”
- Turtle Racing Billet Differential Case Saver Kit
- Turtle Racing Reinforced Axle Set for HPI Baja 5b


Parts needed:
Optional Items:
Step 1: Preform Brake Maintenance
Step 2: Removing the Baja differential
Step 3:
Once the case is separated, remove the gear. It just sits in the case but may stick due to the diff oil. I chose to remove the cross pin set screw before taking the gear out but it is not necessary (See the next step.) You can do it now or later.

Remove the screw securing the cross pin with a 3mm wrench. Its assembled using locktite and my be difficult to remove. Use a screwdriver placed in the diff shaft slots to aid in its removal.


Remove the case plug with a 3/32 wrench and slide the pin out through the hole. Keep an eye out for the little rubber O-ring. These parts are supplied in your New Turtle Racing package but if your like me you will want to save everything just encase.

Remove the cross pin from the side hole. I used a needle nose pliers to help.

Pull the diff shaft from the case.


Remove the outer bearing. You may need to apply GENTLE pressure from underneath with a screwdriver. Be careful doing so as not to damage the bearing. Just work it off a little at a time going around the bottom of the bearing little by little.

Using a pick remove the diff washer on the inside of the case along with the copper bushing under it.

Remove the remaining bearing and the O ring under it.

Now grab the 2nd diff half with the diff gear assembly in it.

Remove the diff gear assembly by simply pulling it out of the case with your fingers. If it comes apart, dont worry just set it aside on a paper towel.

Repeat the steps above on this diff half to strip it down.
——————————————————-
Now the fun part, lets put it all back together now.
Remove the aluminum housing from your new Turtle racing dif half. As you assemble them you can do both at the same time or one half at a time its up to you. There is no difference between the two halvs so just get busy.

Install the rubber bearing seal supplied in your Turtle kit into the case Make sure its seated. I like to lube up all O-rings and rubber gaskets before I install them. Use some diff lube. Im sure there is plenty of it all over the place by now. Just rub some on.


Install the bearing.

Install the outer bearing. Make sure both are properly seated all the way. Press them with your palms. You feel the outer bearing seat and my even hear a pop when it does.


On the inside of the diff install the supplied copper bushing.

Install the diff washer.

Slide one of the two shorter Turtle Racing diff shafts all the way into the dif half.

Install the cross pin from the side hole.

Install the setting screw to secure the pin. Use locktite on the screw. Make sure the pin is centered then tighten it good and tight. Use a screwdriver in the slots of the diff shaft to hold it so you can get the screw good and tight.

Use the Stainless steel case plug and rubber O-ring supplied with your Turtle Racing kit and install it into the side of the diff case. It needs to be seated tight but not so tight it blows out the O-ring seal.

Drop the gear onto the cross pin. If it doesn’t fully seat flat check the cross pin and make sure its centered properly.

Drop in 1/2 of the gear set and cage. It doesn’t have to be all in place. As long as it look something like this your fine.

Work the gears into place against the cage. Make sure the pin is centered and the notch is pointing up.

Drop the 3rd cage in.

Put the 4th cage and the 2nd gear set together like this.

Drop it in. Again, it doesn’t have to be all in place at this time.

Work the gears and the pin into place. The notch in the upper pin must be pointing down and fit into place with the notch in the lower pin that is facing up.. It should all line up and fall into place with a little work. There are other ways to do this but this method works for me.

Lubricate the gasket supplied in your Turtle Racing Kit and drop it into place. It should sit in the groove that goes around the lip on the case. Always us a new gasket when assembling your diff. Turtle Racing was kind enough to include an additional unit with the kit. You should have also received several additional gaskets with your 5B kit.

Fill the diff with the lube of your choice. Make sure to spin the gears to allow the lube to distribute evenly. Fill it up to the top of the cross pins.

Put the two diff halfs together. Make sure you align it so the case plugs are on the same position as shown in the photo.

You will see that one of the aluminum case halfs has notches in it. We will install the large gear onto this half.

Align the screw holes on the case with the holes on the gear.
Press fit the case inside the gear and make sure its seated. If its tight turn the case until you get the best fit. You have 4 chances. It may be a bit tight but it will slide on using hand pressure. Make sure it is fully seated. Take note in the photo of the gear side to install the housing onto.

Install the Turtle Racing housings over the plastic diff cases making sure the hole on the outer aluminum case is lined up with the Stainless steel plugs in the case. Study the photo.

Install the 4 supplied screws making sure you use loctite. Tighten them up in a cross pattern.

What a pretty site!! To bad no one will see such fine workmanship. Just grin knowing its installed.


At this point you can re-install the diff back into the gear box and screw the gear box back onto the chassis, or go to the next optional step of installing the “Missing Bearing”.
*************************
Optional step
Installing the MISSING BEARING.
The next part is an optional step. We will install what is known as the “Missing Bearing”. There is debate as to whether this bearing is necessary or not. The way I see it, it can hurt. Where the input shaft enters the case there is a dust shield that seals dirt out of the diff case. Many believe that there should be a bearing in this spot to better support the shaft. Its obvious by design that a bearing should be here. You have just spent some hard earned money beefing up your diff and rear drive train, your sitting there with the case cracked open, what do you have to loose?
You will need to purchase this bearing as it does not come with the Baja5B from the factory.
(1) 12 X 24 X 6 Bearing can be purchased by clicking the link or it is included in our Full Bearing Kit By clicking this link.
We need to remove the input shaft from the case. Use a 5/64th hex wrench to take out the set pin from the brake hub.

Slide the brake hub off the shaft.

Slide the input shaft out of the case.

Using a needle nose pliers, squeeze the two tabs together on the dust shield retaining clip and pull the clip out.

Remove and clean the dust shield. Apply a small amount of heavy grease to the rubber on the shield. YOU MUST REINSTALL THE SHIELD.

Install the bearing into the case over the dust shield. Make sure it is seated firmly.

Now reinstall the input shaft and the the brake hub.
Drop the rest of the gears into the case.

Reassemble the two case halfs.

Mount the diffcase back into the chassis.

END OF MISSING BEARING INSTALLATION.
**************************
Next we need to install the new Heavy duty Dog bones. The bones that came with your Turtle Racing kit are heavier then the stock units and have been modified to work with the kit and must be installed. The stock units will not properly work.
In this part of the tutorial, I have already reassembled the entire Baja.
A few of these steps will not be needed if you have just upgraded your diff and are putting everything back together.
First we will remove the screw that holds the cross pin. Using a 3mm hex, place it inside the hub until you feel it seat into the head of the screw. You may need to use a pick to clean out the hex head if its full of dirt. Use your wheel wrench to hold the hub if needed.


Once the screw is removed, Use the tip of your hex wrench to push the pin out. If its bent or to tight, use an awl and a small tap hammer.


Next using a 3mm hex wrench, we will remove the screw from the pivot ball.

Using your fingers, gently tug on the inner boot to remove it from the diff shaft. Be careful not to tear it.

Now do the same with the outer boot.


The drive axle should easily slide out. It helps to make sure its clean and free of dirt.


Apply some grease to one end of the dog bone.

Aliign the slots on the drive axle with the pins on the dog bone and slide them together. Once they are together, work the boot over the Axle shaft.

Slide the shaft fully into the hub. Work the boot all the way to the hub so it makes a good seal to keep the grease in and dirt out.

Apply grease to the inner end of the dog bone.

insert the inner end of the bone into the shaft. Do NOT seat the boot at this time.

Reattach the pivot ball to the hub carrier.

Now work the inner boot over the shaft making sure its tight against the diff.

Replete this process for the other side.
Go ahead and put everything back together using the steps listed above in the tutorial.
CONGRATULATIONS!!
You now have the strongest drive train available for the 5B. Your money and time has been well spent.
I would like to thank Turtle Racing for their time and effort on the development of this kit. They stop at nothing to produce the finest quality products available.
During the making of this guide we chose to use a Stainless Steel screw kit to replace the factory screws. Stainless Steel doesn’t rust and offers much better protection against the elements. I also have to say they look great.
We also chose to replace the bearings at the time of this guide.
In our shop we use only Blue Locktite jell stick. Its a lot less messy and can accurately be applied to the threads more so then liquid. Our biggest reason is that it doesn’t separate so there is no need to shake it up before every use.
Get more horsepower using the stock exhaust (Baja 5B RTR Only)
February 3, 2009 by Baja Planet
Filed under Tutorials
This is a simple tutorial on how to get more horsepower using the stock exhaust.
One of the easiest ways to get some free horsepower from your stock engine on the HPI Baja 5B is to remove the stinger and the baffling from inside the exhaust can. Its truly an easy task and the rewards plentiful.
I first removed the stinger off the HPI Baja and noticed a large difference in the low end. Once I removed the baffling, I was amazed at how much more ponies went to the ground. You can choose to do One or both mods depending on your needs.
Parts:
None
Optional parts:
- Needle nose pliers
- 3mm Hex Wrench
- 4mm Hex Wrench
- Screwdriver
- Blue Locktite
Time:
15 Minutes
Skill level:
No Brainer
The first step will be to remove the stinger mounting bracket with a 3mm hex wrench

If you are only removing the stinger, cut the zip tie and gently pull on the pipe till it comes off. You may want to call it a job done and go see what you think. Honestly, take the additional 10 minutes and remove the baffling from the can. It’s time well spent.
If you are going to proceed forward, you can just swivel the pip around and remove it later or do it now. Doesn’t much matter. There are 2 4mm hex screws that hold the can on. Go ahead and remove them.

The can should easily come off with a slight pull. Be careful of the gasket. If it gets ripped or torn, replace it.

Remove the stinger if you didn’t do it earlier.

Now comes the fun part.
Inside the can on the exit port side is some wire mesh and baffling material. We need to remove everything inside the can. I’m sure there are many ways to do this. I found by using a screwdriver and rooting around the inside of the can from the intake side loosened everything up. From there I used a few different needle nose pliers to pull everything out. It took a little work but I eventually got it all out. You need to keep peaking inside to see if you got it all. If you have some kind of bent hook or pick it may work just as well as a screw driver. Look at the tools you have and work with them.

Even my dog took an interest in this one.


You will want to rinse the can out with fluid of some sort to be sure there is no particulate matter or chunks inside. You can also use compressed air if you choose but a fluid is recommended.
Go ahead and reinstall the can onto the HPI Baja using the two long bolts. Be sure to use blue locktite on them or they may back out. Now go out and run your beast and let me know how you like your FREE Power.
I hope you have found this tutorial to be of use to you. If it has, please show your appreciation by stopping by our website TeamFastEddy.com. Many of the tools and parts used in this tutorial are available on our site.
Cleaning your pull start. HPI Baja 5B & 5T
February 3, 2009 by Baja Planet
Filed under Tutorials
This is a simple tutorial on how to do a light cleaning on your HPI Baja 5b pull start after a day of running.
The pull start acts as a dirt and grass trap and collects a large amount of debris every time you run. Its recommended that you clean it out after a day of running or more often if needed. The flywheel acts as an induction fan and pulls everything that comes close to it inside.
If you haven’t yet invested in an Outerwears pull start cover, you will want to visit one of the forum sponsors and get one. It acts as a filter allowing the air in and keeps the larger chunks of debris out. Its good money spent.
Parts:
None
Optional parts:
Stainless Steel Screw Kit
Tools:
- 3mm Hex Wrench
- Toothbrush
- Compressed air
- Lubricant
Time:
5 Minutes
Skill level:
No Brainer
If you are using an Outerwears cover, peal it back and use a cloths pin to hold it out of the way.


You will see (4) 3mm screws, One on each of the corners of the pull start. Remove these 4 screws and pull the cover off.


Use compressed air or a toothbrush to remove any dust, dirt, grass, or whatever may be inside. There is an opening at the back on the bottom rear and everything should blow right out the back. Take a good look to make sure nothing is stuck in there. If so, use a screwdriver, stick, or whatever is handy at the time to remove it.


Once all the loose dirt is removed, use a toothbrush and go over everything to remove the stuck on dirt. You will want to do the same with the pull start itself both inside and out.
The pull start mechanism needs lubrication on the moving parts. Use grease or a greaseless lubricant. No need to overdue it. A little dab will be fine. We choose to use a greaseless spray. It will need to be re lubed more often but doesn’t attract dirt like grease does.

This is a great time to inspect all the parts. Take a little time and look everything over. Inspect the plastic and nylon parts for wear as well as the pull rope and the knots that hold them. Replace any parts as needed. There is nothing worse then having a broken pull start and having to go home when a simple inspection would have prevented this.
Once everything is clean, reinstall the pull start assembly onto the engine. If your using an outerwear cover, make sure its properly secured and that the Velcro strip is tight and secured all the way around the pull start case and not coming off.
I hope you have found this tutorial to be of use to you. If it has, please show your appreciation by stopping by our website TeamFastEddy.com. Many of the tools and parts used in this tutorial are available on our site.
Rebuilding / upgrading the HPI steering servo.
February 3, 2009 by Baja Planet
Filed under Tutorials
This is a simple tutorial on how to upgrade your HPI Baja B5 Servo to a metal gear set.
One of the first upgrades you will want to make on your new Baja is a metal gear set for your steering servo. The servo itself is a good powerful unit that will last a long time once upgraded. From the factory it contains nylon gears that brake and strip easily from the power and weight of the HPI Baja B5.
Parts Needed:
HPI Metal Gear Conversion Set for the SFL-10 Servo (Part #80584)
Tools Needed:
- Needle nose pliers
- 5/64th Hex Wrench
- 3mm Hex Wrench
- Small Phillips head screwdriver
Time Required: 1-2 hours
Skill level: Easy
We will start with the parts needed to complete this task. You will need the HPI Metal Gear Conversion Set for the SFL-10 Servo Part# 80584 It consists of 3 metal gears, 2 Nylon Gears, 1 Rubber O-Ring, and 1 Tube of silicon grease. The package also contains a sheet with directions and pictures.

The steering servo is located and mounted under the radio box.

The first step will be to get the roll bar out of the way. At this point you can either remove the entire roll bar or do as I did and just unfasten the front two clips that hold it to the chassis. (See photo below). Use a pair of needle nose pliers and pull the two clips out. There are plastic washers that will fall out when the clips are removed. If they don’t fall out, remove them so they don’t get lost.

The next thing we are going to do is remove the servo horn from the throttle / brake servo. Use a 5/64th Hex wrench and remove the screw. Pull the servo horn off the servo and remove the linkage end. Now you should place the servo horn back on the servo making sure it goes back in the same exact position it was in when to took it off. This will keep you from having to re-align it later.


Next we need to remove the steering servo linkage from servo saver assembly.
Use a 3mm Hex Wrench and simply unscrew it.

Remove the 4 clips holding the radio box in. Grab the roll bar with one hand and the radio box with the other. Now slide the radio box out while lifting on the roll bar. It should just slide out.


Next we are going to open up the radio box by removing the clip on the front. Inside you will see the receiver, battery and a bunch of wires. We will now unplug the steering servo wire from the receiver. The steering servo wire is located on channel 1. Look on the receiver and there will be numbers marked next to the plugs. Using your fingers, gently pull the plug out.
Take note that the wires are color coded. When you reassemble the radio box, make sure you plug the connector back in the same as the others. Look at the wire colors

Next we will remove servo horn from the steering servo using a 5/64th hex wrench. Before you remove the horn position it exactly strait up and down. You don’t have to do this but it helps make sure everything inside is aligned.

Using a 5/64 Hex Wrench, remove the 4 screws holding the servo to the servo mount. Once this is done, slide the servo out from the holder.

On the bottom of the servo you will see 6 screws. Remove the 6 screws from servo case with a small Phillips head screwdriver. Note that each screw has a rubber O-ring on it. Make sure that it comes out with the screw and is not left in the case. Its helpful to slide the O-ring up to the head of the screw once it is out. The O-ring is designed to help keep moisture out of the servo.

Using your fingers,separate the bottom case cover from the servo. There will be a thin rubber seal, an O-ring if you choose to call it that, that is located on the outer edge of the servo case. It may just fall out when you separate the case or it may not. Remove the case seal and inspect it for damage. If its cut or pinched contact HPI for a replacement.
Now remove the top servo case cover. You may get a hand full of parts when you do this or you may not. If everything falls out don’t worry all is fine. Remove all the gears, they should slide off the pins. Some of the pins and gears may still be inside the top cover so make sure you inspect it. Just like the bottom case cover, there will be a rubber O-ring.

If you are upgrading a used or broken servo, you will need to clean out any broken pieces of gear and any other contamination that may have collected inside. Use a DRY paper towel and some Q-tips to do so.
Now comes the fun part.
If you are upgrading a brand new servo you can skip this step and just set the main reduction gear with the bearing and seal aside and skip the next step. The main reduction gear in the upgrade kit is the same one that is in the stock servo.
Remove o-ring and bearing from main reduction gear. Using the new gear supplied in the upgrade kit, install the bearing on the shaft. Make sure its properly seated all the way around. Now slide the rubber O-ring over the shaft until its sitting on the top of the bearing.

Place the main reduction gear on servo. Take note of the large tab on the gear. Its important that it placed as shown in the photo below. The tab must be centered and pointing in the direction closest to the side of the servo. looking at the photo it will point to the left.

Its puzzle time. Place the rest of the gears on the shafts as shown in the next several photos. Each of the gears are a little different. Look at and match up the gears with the photos. The easiest thing to look at is the thickness of the gears. Again just match them up to the photos and you’ll have no trouble. [COLOR=”Red”](Please not that the tab on the main reduction gear MUST be set in the proper place show in the photo above NOT in the position you see in the next few photos.)[/COLOR] The kit contains a tube of white grease. Use small amounts on the gears. There is no need to over do it. Just a small dab on each gear is fine. I placed a dab where ever two gears touched. When the servo is operated it will spread the grease as needed.


Photo time is over and its time to start putting everything back together.
Place the rubber seal back onto the top of the main servo case. There is a recess that goes all the way around the case. Make sure the O-ring is set into this recess all the way around. Avoid any twisting of the ring and make sure it sits around the case properly and snug. I put a small amount of the white gear lube on my fingers and spread it evenly on the ring before I installed it.
Place the top cover on the servo making sure it properly seats against the O-ring all the way around. It may take some fiddling with to get seated properly. Again, Look at the tab on the main reduction gear and make sure its in the proper position before you place the top cover on the servo.
Place the seal on the bottom of the servo case and install the bottom servo case cover. Again make sure it is properly seated on the O-ring.
Install the 6 screws. There are several things to watch for. First, look to see that the holes line up properly. On my servo, the cover only went on one way. It was close but on my first try, the 4 corners went in fine but the circuit board was just a tiny bit off so the other screws wouldn’t slide in. Is it like this on all servos, I’m not sure. So look before you start to tighten everything up.
Make sure that each screw has the rubber O-ring on it. Slide the ring to the top of the screw closest to the head.
Dont tighten the screws all the way down at this point, just till they touch. Once they are all in take a look and make sure that the top and bottom case covers are properly seated and not pinching the O-ring. Once you are happy with the way it looks, Use a star pattern as you tighten the screws. Dont just fully tighten one and move to the next. If you do that you will most likely damage the O-rings. Dont over tighten them. You want them to be snug but no more then that.
Once the servo is all back together ill recommend that you plug it into the radio and give it a test. It should operate properly in both directions without any nu-natural grinding noises. Set your transmitter steering trim to 0 so the servo is centered properly. At this point its a great time to install the servo horn. I like to do this with the radio on so I know the servo is properly centered.
Place the servo horn back on the servo. It is important to place the horn back on in the proper position. When your looking at the top of servo with the servo horn shaft on the left side the horn should be placed on the shaft 1 spline to the right of center. As you look at a clock it should be at 1:00.
Your on your own now. Go ahead and follow the tutorial backwards to re-install everything. Please use the photos to help refresh your memory if needed. You will want to make sure you don’t pinch any of the servo wires so be careful.
I hope you have found this tutorial to be of use to you. If it has, please show your appreciation by stopping by our website TeamFastEddy.com Many of the tools and parts used in this tutorial are available on our site.
Removing the Baja transmission & adding differential fluid.
February 3, 2009 by Baja Planet
Filed under Tutorials
From the factory, the HPI Baja 5b RTR and 5T diff is usually under filled or dry. Checking and filling the diff should be done before you run your HPI Baja for the first time. Please take the time to do this if you don’t, your diff will wear out prematurely. The task isn’t hard but there are several steps. Make sure you have plenty of time and space to do this maintenance task. It will help to have a few small boxes or containers handy to place your parts in. It will also help to have a rag handy. Take your time, look at the photos, and read your owners manual. This is a great time to get to know your HPI Baja 5b. If have been running your rig this is a great time to clean everything and inspect for damage and to replace any worn out parts. Parts needed:
- Diff lube (Supplied in the fluid bag of your new Baja)
- Diff gasket (Supplied in the fluid bag of your new Baja)
Optional Items:
Tools:
- Needle nose pliers
- 3mm Hex Wrench
- 4mm Hex Wrench
- Blue Locktite
Time: 2-5 Hours depending on your shill level. Skill level: Medium
Step 1: Preform Brake Maintenance Remove the HPI Baja roll bar by taking off the 4 clips, one on each corner of the cage. You will need to remove both shocks and the shock tower brace using a 3mm wrench. 
 If you have a stinger on your stock exhaust remove the support bracket then Remove your exhaust can. There are two screws 4mm on the front. If your looking for a little better performance, don’t re-install the stinger pipe onto the exhaust can during re-assembly. The can should come off with a little finger pressure. Take note of the exhaust gasket. If it is riped or torn, replace it.
 Remove the rear bumper cage. 2- 3mm screws on the top plate and 2 on the bottom. With a little wiggling it will slide off. Watch out for the nuts that are used on the bottom screws they will most-likely fall out.

 Remove the screws from the rear top ball ends using a 3mm hex wrench.
  Slide out the 2 hinge pins holding the upper A-Arms. They should easily slide out. If needed you can use a pair of pliers to help. If you need pliers, check to see if the pins are bent. If so, replace them.
 Remove the remaining 2 screws in the top plate. Watch for the nuts on the bottom and the copper colored brake shaft bushing, they will most-likely fall out.
 Remove 2 screws from the each shock tower again watching for the nuts. The towers will fall right off.

 On the bottom of the chassis remove the 4 screws that hold the gear box to the chassis.
  Slide the inner boots off the out drives.
  Now lift the gear box out.
 Congratulations, you now have the easter egg in your hand. Go enjoy your favorite beverage.
  Using a 2.5mm hex wrench remove the cross pin that holds the brake hub and slide the hub off the shaft.
  With your 2.5mm wrench remove the 5 self taping screws from the diff case.
  Gently slide the 2 halves of the case apart. Dont worry, nothing will crawl out and byte you.


 Do keep an eye out for the 2 cross braces that are on the inside. They slide in on the bottom of the case and have those pesky little nuts in them. Keep an eye out during assembly to see that the nuts are there and in place before you seal the case back up.
  Remove the 4 screws that hold the gear on. Again, watch for the nuts.
  Remove the gear from the case being careful you only remove the gear and not the top of the case. Try not to separate the case at this point. It will help keep things clean if make sure to hold the diff upright as shown in the photo.
  Hold the case upright and remove the top cover.
  As you are removing the cover, there is a diff gear that may be stuck to the case or it may be laying on the top of the 2nd case half. Go ahead and remove it so it doesn’t fall out or get lost. During assembly this gear will set into the top half of the diff case and needs to be set onto the cross pin properly or the case wont properly close.
  Remove the rubber gasket that seals the two case halves. Its recommended to replace this gasket each time you take the diff apart. There is a new one included in the spare parts bag of your new HPI Baja. During reassembly, make sure you have the gasket properly seated in the groove as not to pinch it.
  At this point you can inspect and replace any worn parts you find inside the diff. We are not going to go into rebuilding the inside of the diff at this time. Look for another tutorial sometime in the near future. Guess what, Its DRY! Not a drop of viable lube in this bad boy. Fill the diff with the supplied diff lube or do some research and decide if you want to go with a different weight. This is entirely up to you. There are many opinions on diff fluid weight and how much to use. We chose to use Mugen 7K weight and to fill the diff up to just above the cross pins. As you are filling the diff make sure you rotate the gears to allow the fluid to go down inside the case. If you just dribble some in and close the case you will not have gotten enough in there. Let it sit for a few minutes then check it again. Repeat this process until you are sure the fluid has settled in and there is enough.
  We chose to replace all the bearings at this time before we reassembled the diff.

 To reassemble your HPI Baja 5b, follow the tutorial backwards referring to the photos and descriptions to help guide you. During the making of this guide we chose to use a Stainless Steel screw kit to replace the factory screws. Stainless Steel doesn’t rust and offers much better protection against the elements. I also have to say they look great. We also chose to replace the bearings at the time of this guide. In our shop we use only Blue Locktite jell stick. Its a lot less messy and can accurately be applied to the threads more so then liquid. Our biggest reason is that it doesn’t separate so there is no need to shake it up before every use. If you’ve find this How to guide or tutorial helpful. You can show you support by visiting our sponsor TeamFastEddy.com.
Brake maintenance for your HPI 5B & 5T
February 3, 2009 by Baja Planet
Filed under Tutorials
Your brakes are an important part of your Buggy. If they aren’t properly maintained your flirting with disaster. Its an easy task and only take a few minutes.
Parts:
- Brake pads HPI #87456 (As Needed)
- Brake disk Rotor HPI #87424 (As Needed)
- Brake shims HPI #87437 (As Needed)
Optional parts:
- Baja 5B Stainless Steel Screw Kit
- (1) 12 X 24 X 6 Rubber shielded bearing
- Complete Baja 5B Bearing kit
- Body Clips
Tools:
- Needle nose pliers
- 3mm Hex Wrench
- 5/64th Hex Wrench
- Blue Locktite
Time:
30 minutes or less
Skill level:
Easy
Remove rear wheels. If your only doing brake maintenance you can just remove the right rear. Remove gear cover and plastic plate. There are 2 Body clips holding the cover on. they are located on the rear of the cover. There is a flat button on the front of the cover that can be rotated to make removing the clip easier. Use your needle nose pliers to pull the clips out. At his point the cover will come right off. You will also need to remove the plastic plate located above the spur gear.


Now remove E-Clip that holds the spur gear onto the shaft.
Place the tip of a small flathead screwdriver in between the shaft and the E-Clip and gently twist the screwdriver. You may want to make a tent with a rag over your hand and the spur gear to keep the clip from flying across the room.

Once the clip is removed, pull evenly on both sides of the spur gear to remove it from the shaft.

Remove the purple bushing from the shaft.

Using a 5/64th hex wrench, loosen the brake leaver set screw. Slide brake leaver out of the cam shaft hole and let it hang out of the way. Make sure you don’t loose the set screw. You will also want to use some Blue Locktite on the set screw when you reassemble it.

Remove the 3 screws securing the top brake holder plate. Be careful you don’t drop or loose the copper colored brake cam bushing that is inserted in the top plate.

With your fingers reach in and remove the brake pad assembly, purple top plate spacer, and brake cam.
Inspect the brake pads for excessive wear. If they are 1/2 used or more you will want to replace them.

Using a 3mm Hex wrench, remove the 2 screws from the gear plate that are the farthest to the right. One on each side of the pinion gear.

Rock the pate with your hand sliding it off the end of the shaft. This is a good time to check the condition of the bearing located in the center of the plate you just removed. If it looks damaged, doesn’t freely rotate or feels the least bit rough as you spin it, its time to replace it.

Slide the brake rotors and fin plate off the shaft. Inspect the rotors for wear if they are 1mm or less in thickness you will want to replace them. Its always best to replace all the worn brake components at the same time. It will insure that you have proper braking at all times.

Follow the tutorial backwards using the photos as a guide to put everything back together. Make sure you adjust the brake linkage properly after reassembling everything. Consult the HPI 5B Users Manual for the proper settings.
During the making of this guide we chose to use a Stainless Steel screw kit to replace the factory screws. Stainless Steel doesn’t rust and offers much better protection against the elements. I also have to say they look great. We also chose to replace the bearings at the time of this guide. In our shop we use only Blue Locktite jell stick. Its a lot less messy and can accurately be applied to the threads more so then liquid. Our biggest reason is that it doesn’t separate so there is no need to shake it up before every use.
We hope you find this How to guide or tutorial helpful. You can show you support by visiting our sponsor who made this article possible – TeamFastEddy.com
SWB Double-Loc Servo Arm for Hitec 5745MG Steering servo
February 2, 2009 by Baja Planet
Filed under Product Reviews
Comments Off on SWB Double-Loc Servo Arm for Hitec 5745MG Steering servo
Submitted by RobMob
When the 5T was released, HPI included a new aluminum servo horn for it’s steering servo that matched the length of the plastic servo horn included with the 5B. I have been using the Hitec 5745MG steering servo with the included blue aluminum servo horn. The two problems I have with this horn is that it is not as long as HPI’s and it has a tendency to come loose on occasion.
After seeing HPI’s new aluminum horn, I began a quest to find an aluminum one that had the same length and would fit fit the Hitec servo.
SWB Manufacturing makes what they call Double-Loc Servo Arms for Hitec, JR and Futaba servos in varying lengths and syles.

The 1.25″ Half-Arm is the perfect match to the HPI aluminum arm.
This review is for the Hitec Double-Loc Servo Half-Arm, but the Futaba version will actually work for the stock HPI steering servo which is made by Futaba.
What you get:
In the packaging you will receive the servo horn along with the screw and nut for the nut. You will need the screw from your servo in order to attach the horn to the servo itself.
Note that the pic is for a 1” horn, the packaging is the same for the 1.25”
Installation:
This is what set this horn apart from the stock blue aluminum horn that most guys run when using the Hitec 5745MG. To install you will do what you normally do with any other servo horn line it up and push the horn until it seats completely down. On this little guy, you will only be able to push it down so far before it won’t go any further. It is a tight fit to say the least. From here you could use an arbor press to push it down all the way. Or you can just put the screw into the horn and proceed to tighten it down. The horn will be pressed into place by the screw. This worked on both of my installations. Use a drop of blue loctite on the clamping screw and install it with the supplied nut. Once installed, you will notice that there is zero movement of the horn on the servo splines.
To install the ball end, simply put it in the desired hole and tighten it down. The threads in the horn are smaller than the ball end threads, but since the horn is aluminum and softer than the ball end, it will thread itself in just fine. Be sure to install the nut on the back side to secure it.
Testing:
The thickness of the horn is the same as the blue aluminum one you get with the 5745MG servo which is much thinner than the new HPI aluminum horn. This means much less rotating mass the servo has to turn.
Note that since the horn is thinner than the HPI aluminum horn, the issue of the ball end hitting the top plate is eliminated when using the top mounting hole.
The first day of testing was at the Thunder Valley 8th scale off-road track. I ran a 10 minute practice, two 10 minute heats and a 12 minute main.
The horn performed flawlessly and was still secure.
Before I sat down to write this review, I wanted to be sure of my initial finding so once again I made my way to Thunder Valley only this time it was a practice day on the new 5th scale track. On this day I ran 4.5 tanks of fuel through my 5T.
Once again the horn performed flawlessly and showed no signs of bending or loosening.
Comparison Pic
The SWB Double-Loc Servo Arm gets a 3-Thumbs up from me.
It is a great alternative to the HPI arm for guys running the Hitec 5745MG steering servo.
Different lengths are available for other applications as well. I picked up a few 1” long arms to use on my crawler steering servos which tend to come loose after running.
You can order direct from SWB Manufacturing or from Esprit Models where I ordered from for $10.00 each plus shipping.
Be sure to tell them HPIBajaTutorials.com sent you.
ATX Splash/Rock Guards For The Baja 5T.
February 2, 2009 by Baja Planet
Filed under Featured, New Product Releases, News
Here is the latest in the 5T line-up from ATX Poly Products.
ATX Rock/Splash Guards:
Built from quality extruded polycarbonate “lexan”
Stainless hardware
Stong extra wide Nylon Clips.
Photos of installed and after running….


Plastic spur gears from Hostile
February 2, 2009 by Baja Planet
Filed under New Product Releases

These high quality injection molded gears will be offered in the following sizes:
- 57 tooth
- 56 tooth
- 55 tooth
- 54 tooth
They match the 17, 18, 19 and 20 tooth pinions respectively.
Matched gear sets will also be available with pinions made by Robinson Racing.
Available from your favorite dealers.
Second Greek Baja Endurance Race (Coverage and results)
February 1, 2009 by Baja Planet
Filed under Baja Racing

Second Greek Baja Endurance Race
The second race of Greece Baja Endurance Series was recently held, with great success! We had twice the number of teams participating this time, compared to the first event. Ten teams fought for the win in a fun yet competitive race!
 |
 |
 |
| The second through fifth place teams were on the same lap after 1 hour of hard driving, and the unbeatable quality of Baja was impressive once again – no major repairs needed to be made for any car, just some minor repairs from driving mistakes. One of the teams even drove with 3 tyres and 1 wheel without tyre for the last half an hour and the Baja took the finish flag!
Congratulations to all of the teams and especially the winners who had enough experience from the Baja Endurance Challenge Finals race in Spain. |
|
|
|
| We would like to thank Rc-world.gr, Radiocontrol.gr, Modelteam.gr, Rcmaniacs.gr for covering the race. Please visit these sites to see many more pictures from the race!
Final Results |
|
|
|
|
|
|
Footage with an Arabian Flavor
February 1, 2009 by Baja Planet
Filed under Baja Videos
Comments Off on Footage with an Arabian Flavor
From: Mohammed T
HPI At The Toyota Grand Prix of Long Beach
January 31, 2009 by Baja Planet
Filed under Featured, News, Other RC & Motor Sports Events


HPI Racing in conjunction with Tamiya America, Inc. and Kyosho of America announce today their participation in the Toyota Grand Prix of Long Beach, on April 16-19, 2009.
Article Courtesy OF HPI RACING
Link: www.hpiracing.com
The three largest hobby manufacturers in the world will be joining forces at the 2009 Toyota Grand Prix of Long Beach [LBGP], in the first “Radio Control Motorsport Experience.” This collaboration within the hobby community is aimed to increase awareness for the hobby grade radio control market. The combined marketing forces at HPI Racing, Kyosho America and Tamiya America, Inc. are prepared to take their respective companies to a broader audience than what is currently available within the radio controlled hobby industry.
The 2009 LBGP is set to celebrate the 35th anniversary. This will be the second race of the 2009 IndyCar Series brought to you by DIRECTV HD. Support races include American Le Mans Series, Firestone Indy Lights, SCCA SPEED World Challenge GT Series, Formula Drift Series and the world famous Toyota Pro Celebrity Race featuring an eclectic roster of celebrity icons.
A major component of the event is the Lifestyle Expo, which is held at the Long Beach Convention Center. The Long Beach Convention Center is centrally located within the temporary street circuit that is assembled every year to run the racing event. Over one hundred and eighty-five thousand spectators are expected to pass through the event during its four days of operation exposing the hobby industry to mainstream and motorsport enthusiast crowds.
The Lifestyle Expo contains many attractions for Grand Prix attendees, including a Kids Zone. HPI Racing, Kyosho of America and Tamiya America, Inc. will showcase numerous products as well as demonstrate R/C Drifting, R/C Rock Crawling, R/C Tanks and Mini R/C tabletop race cars.
We invite motorsport fans, hobby enthusiasts and anyone else looking to see what’s new and exciting in R/C. Radio Control products will be on display and demonstrated at the 2009 Toyota Grand Prix of Long Beach. “Gentlemen, start your engines!”
If you would like more information about this topic, please call:
HPI RACING – Rodney Wills at (949) 753-1099 ext 107 or email [email protected]
TAMIYA – Fred Medel at (949) 362-2240 ext 846 or email [email protected]
KYOSHO – Cliff Black at (949) 454-8854 or email [email protected]
About LBGP
The Long Beach Grand Prix [LBGP] is the longest running major street race held on the North American continent, starting on March 26, 1977 and having completed its 34th consecutive event in 2008. The LBGP started as a Formula 5000 open-wheel race held on a temporary road course making use of the streets of Long Beach, California, and became a Formula One event the following year. From 1984 to 2008 the LBGP has been a CART/Champ Car event with other popular events during the Grand Prix weekend including a Champ Car Atlantic series race, a Historic Grand Prix featuring pre-1990 race cars, and the Toyota Pro/Celebrity Race. In 2008, Champ Cars series merged with the Indy Racing League to form the Indy Racing League marking its second season at the 2009-LBGP. The Toyota Long Beach Grand Prix is the single largest event in the city of Long Beach, CA with attendance for the weekend regularly reaches or exceeds 200,000 people. www.gplb.com
About HPI RACING:
Established in 1986 in Southern California, HPI Racing (Hobby Products International) of Foothill Ranch, California, USA is a global leader in the radio controlled racing car section of the hobby industry. The HPI Group includes: HPI Racing, Foothill Ranch, CA; HPI Japan, Hammamatsu, Japan; and HPI Europe in the United Kingdom. HPI Group also produces collector diecast models, Hot Bodies (R/C competition specialties), R/C airplanes (456MB) and R/C robots. HPI USA currently operates out a 45,000 square foot facility in Foothill Ranch, California and oversees manufacturing operations there as well as in Japan and Taiwan. HPI has licensing agreements in place with GM®, Ford®, Lamborghini®, DaimlerChrysler®, Lotus®, Honda®, Porsche®, Toyota® and all major American, European and Japanese automakers; as well as equipment manufacturers such as Yokohama Tires® and Eibach Springs®. HPI Racing’s global footprint includes Argentina, Australia, Brazil, Canada, China, Denmark, England, Ecuador, Finland, France, Germany, Greece, Iceland, Italy, Holland, Hong Kong, Hungary, Japan, Korea, Malaysia, Lebanon, New Zealand, Norway, Poland, Portugal, Singapore, South Africa, Spain, Sweden, Switzerland, Taiwan, Turkey, Thailand and the United States. www.hpiracing.com
About TAMIYA
Tamiya ventured into the modeling business in 1948, with a scale wooden ship model kit. Since then, Tamiya has been striving to offer merchandise that can truly be called “First in Quality Around the World.” Now Tamiya is offering more than 1,500 different products in the fields of precision static models, educational kits, finishing supplies and high performance radio control vehicles. These products are not only sold in Japan, but also exported in vast quantities to the United States, Europe, South East Asia, and to many other parts of the world. Tamiya America, Inc. was established in 1989 to expand its global reach and to further develop hobby products for the American market. Tamiya America, Inc. was also established to conduct various promotional events which include a national radio control car championship series known as TCS and various modeling contests. The standard of excellence achieved by Tamiya is regarded as among the very finest in the world of model hobbies. Tamiya’s replicas achieve the highest level of accuracy due to its close relationships with its licensing partners who include: Ferrari®, Ford®, Lamborghini®, Volkswagen®, Jeep®, Scania®, Subaru®, Toyota®, Nissan®, Citroen®, BMW®, Mercedes®, Suzuki®, Porsche®, Lockheed Martin®, Boeing®, Northrop Grumman®, Yamaha®, Ducati®, Kawasaki® and Honda® www.tamiyausa.com
About KYOSHO
Kyosho’s philosophy has always been to show the world the value of enjoying life through the model hobby. Since its foundation in 1963, Kyosho has lived by this and there is no end to the pursuit of this goal. The R/C car and truck line-up includes both nitro and electric powered vehicle in multiple scales including but not limited to the multi time World Champion Inferno and Evolva 1/8 cars as well as the Ultima RB5 and Lazer ZX-5 buggies. Kyosho also has world-class R/C planes and helicopters from the SQS Series of planes that feature solid construction, a high level of detail and superior flight characteristics, to the Caliber line of Helicopters, which many credit as the start of the R/C heli market. Kyosho also takes to the water with a full fleet of R/C boats including sailboats and powerboats. All this in addition to the hundreds of licensed dNaNo and Mini-Z Micro R/C cars and premiere level die-casts featuring all the worlds major automotive manufacturers including premiere brands such as: Toyota®, Ferrari®, Honda®, Lamborghini®, GM®, Porsche®, Mazda®, Mercedes®, BMW®. All of this combined with headquarters in all the major markets has lead us to our title World’s Finest Radio Control Models. www.kyoshoamerica.com
CraftWerks-RC HPI Baja Pull Start Rope Replacement
January 31, 2009 by Baja Planet
Filed under New Product Releases, News
New From CraftWerks-RC! Finally a replacement for those worn out pull start ropes. Never get stranded again when it’s time to go out and bash or heading to a race. These replacements are a must have in your pit box!<

Our Products are sold exclusively through TeamGoNads and there dealer network. Check out http://www.teamgonads.com/for more details.
CraftWerks-RC “Scale” Lighted Buggy Whip for the HPI Baja 5B/5T
January 31, 2009 by Baja Planet
Filed under New Product Releases, News
New from CraftWerks-RC, The first ever Lighted Buggy Whip for large scale r/c cars, trucks and buggies. Made from high quality components and materials to withstand the most extreme conditions and use. These install in just minutes and take nighttime bashing to a whole new realistic level.
Our Products are sold exclusively through TeamGoNads and there dealer network. Check out http://www.teamgonads.com for more details.
HPI Baja Aftermarket Manufacturers Listing
January 31, 2009 by Baja Planet
Filed under Aftermarket Parts Manufacturers
The most comprehensive List of Baja parts manufacturers on the face of the “BajaPlanet ”
Click on a company to see and purchase their products
- ADA Racing Products
- AMS Products
- ATX Products
- Allanach Racing Products
- Allsopp Racing Products
- B&T Products (Baja Planet Sponsor)
- Bad Doggie Products
- Bad Horsie Products
- Baja 5b Custom Build Products
- Baja Skins Products
- Baja Skunkworks Products
- Bash-Proof Products
- CBE (Custom Baja Electrics) Products
- CST (CustomStreet Toyz) Products
- CY – Chung Yang (Fuelie) Products
- Champion Products
- Craftwerks Products (Baja Planet Sponsor)
- DDM Racing Products (Baja Planet Sponsor)
- DPS Products
- DarkSoul Racing Products (Baja Planet Sponsor)
- DieMaster Products
- ESP (Earth Surfer) Products
- Elcon Products
- FLM (Fast Lane) Products
- Full-Force RC Products
- GBE (Gabe Brown Engineering) Products
- GH (Golden Horizon) Products
- HBZ-USA Products
- HPI Racing Products
- HRS Racing Products
- Hitec Parts
- Hormann Products
- Hostile Products (Baja Planet Sponsor)
- IHP Racing Products
- Illussionss Products
- Jet-Pro Products
- K&N Engineering Products
- KRD Products
- Klotz Products
- Lauterbacher Products
- LunaTik Products
- MRC (Model Rectifier) Products
- Mielke Products
- Multiplex Products
- NGK Products
- Nomadio Products
- Numbnuts Creations Products
- OOC (OutOfControl) RC Products
- Outerwears Products
- PB Kill Switches Products
- Parma International Products
- PhatDad – RC Products
- Pro-Line Products
- Protecta Products
- Python Products
- RC Evolution Products
- RC4WD Products
- RPM Racing Products
- RR (Robinson Racing) Products
- RSX Racing Products
- RamTech Products
- Rcscrewz Products
- Rhino Racing Products
- SUH Racing Products
- Scorpion Unlimited Products
- TFE (TeamFastEddy) Products (Baja Planet Sponsor)
- TGN (Team GoNads) Products (Baja Planet Sponsor)
- TR (Turtle Racing) Products (Baja Planet Sponsor)
- TS (Trevor Simpson) Products
- Threshold Products
- Tony’s Screws Products
- Unifilter Products
- VG Racing Products
- VP (Vertigo Performance) Products
- Venom Racing Products
- WSE (White Socks Engineering) Products
- Walbro Products
- Worx Products
- XXX Main Products
- Z-RC Products
- Zenoah Products
Baja 5B SS & Tamiya DF-03RA From Nitrodrink
January 31, 2009 by Baja Planet
Filed under Baja Videos
Nitrodrink´s ultimate rc car compilation
January 31, 2009 by Baja Planet
Filed under Baja Videos
Comments Off on Nitrodrink´s ultimate rc car compilation
Video from the Avon Park GTG
January 31, 2009 by Baja Planet
Filed under Baja Videos
Comments Off on Video from the Avon Park GTG
Baja Back flips
January 30, 2009 by Baja Planet
Filed under Baja Videos
Comments Off on Baja Back flips
Free Style Baja-X #3 From Rallyette
January 30, 2009 by Baja Planet
Filed under Baja Videos
Comments Off on Free Style Baja-X #3 From Rallyette
Free Style Baja-X #2 From Rallyette
January 30, 2009 by Baja Planet
Filed under Baja Videos
Comments Off on Free Style Baja-X #2 From Rallyette
Big jumps vid from Travis Brock
January 30, 2009 by Baja Planet
Filed under Baja Videos
Comments Off on Big jumps vid from Travis Brock
Thunder Valley RC Park
January 30, 2009 by Baja Planet
Filed under Baja Videos
Thunder Valley 5T from Mike Conser on Vimeo.
BajaCross Track Video
January 30, 2009 by Baja Planet
Filed under Baja Videos
Comments Off on BajaCross Track Video
| You Tube | |
XTREME RC CARS: Baja 5B Video
January 30, 2009 by Baja Planet
Filed under Baja Videos
Comments Off on XTREME RC CARS: Baja 5B Video
Baja 5Ts Racing on a track
January 30, 2009 by Baja Planet
Filed under Baja Videos
Comments Off on Baja 5Ts Racing on a track
Baja 5b at Dumont Dunes
January 30, 2009 by Baja Planet
Filed under Baja Videos
Comments Off on Baja 5b at Dumont Dunes
Install: Threshold Umbrella seals for the Baja shocks.
January 30, 2009 by Baja Planet
Filed under Tutorials
Comments Off on Install: Threshold Umbrella seals for the Baja shocks.
This is a much needed upgrade and is an addition to the stock seals.
__________________
Installing the Modified RC Quick Disconnect Roll Cage Tubes.
January 30, 2009 by Baja Planet
Filed under Tutorials
__________________
Shimming your front hubs with Team FastEddy Pro Series Shim Kit
January 30, 2009 by Baja Planet
Filed under Tutorials
Comments Off on Shimming your front hubs with Team FastEddy Pro Series Shim Kit
This tutorial covers the proper use and placement of shims on your front hubs. Shimming your hubs are an essential part of not breaking down while your out having fun. If there is to much play in your hubs the possibility of your front wheels falling off under impack is far greater. Sit back, grab a beverage and see how its done.
Shimming your front hubs
| You Tube | |
Installing Threshold VCC Rezzi,s for the SS, 5T shocks.
January 30, 2009 by Baja Planet
Filed under Tutorials
This tutorial will help dissipate the mystery of building and filling them.
__________________
Using the Team FastEddy Bearing greaser
January 30, 2009 by Baja Planet
Filed under Tutorials
The “Greaser” is a great tool to keep your bearings fresh and to prolong the their life. It a great tool to have in your shop
Enjoy!
Available at TeamFastEddy.
http://www.teamfasteddy.com/index.ph…&cPath=335_336
Tutorial: Installing the DS Sikk 26 Billet Heat Synk.
January 30, 2009 by Baja Planet
Filed under Tutorials
This tutorial introduces the Sikk 26 cylinder and the DarkSoul Billet Heat Synk designed for the 2 stroke RC Engines used in the Baha and other RC brands. Not only does it cover the installation of these items it also offers basic engine rebuilding tips for the replacement of all top ends.
Its a long tutorial close to an hour long but is well worth watching if you are going to install this combination or want more information on how to install any new top end
Issues covered in this tutorial include disassembling your engine, removing the coil and head, removing the piston and connecting rod bearings, and the proper installation of and reassembly of all the above mentioned items.
Kickback, grab a beer and watch this DarkSoul tutorial produced with all the style and grace of all TeamFastEddy tutorials. 
Product link:
http://www.teamgonads.com/Merchant2/…oduct_Count=13
Tutorial link:
http://www.rcdocuments.com/tuts/Dark…nder_Shell.wmv
Rebuild a 2 stroke Baja engine start to finish
January 30, 2009 by Baja Planet
Filed under Tutorials
Team FastEddy partnered up with DarkSoul Racing to prepare this video tutorial. We spent 2 full days not only making the video but having a little fun as well. Please view the tutorials and feel free to ask questions you may have or to comment on the tutorials.
Video #1
__________________
Installing the Turtle Racing Rear Shocktower Brace on the Baja 5T
January 30, 2009 by Baja Planet
Filed under Tutorials
__________________
Turtle Racing Baja5T Front upper plate review and Install
January 30, 2009 by Baja Planet
Filed under Tutorials
Comments Off on Turtle Racing Baja5T Front upper plate review and Install
If you dont have one, its a worthy upgrade over the stock front plate.
This video will cove the installation of the front plate.
__________________
Replacing your piston ring Tutorial
January 30, 2009 by Baja Planet
Filed under Tutorials
Comments Off on Replacing your piston ring Tutorial
Thanks to Yamadude for taking his time to send this to us.
OK first this only covers the ring change itself the rest of Ed and Ted’s vid cover the rest.
First start by removing the old ring from the piston.
Shown here is the ring still installed on the piston.
Now I use just my fingers for this but they do have ring removal tools that can be purchased but for these little guys I like to do them by hand.
Starting from one side use your fingernail or finger itself to get a hold of one side of the ring.

Then slowly work your ring around the piston making sure not to pull to hard or use any excessive force while working it around the piston,just spin it around till it comes off without force.
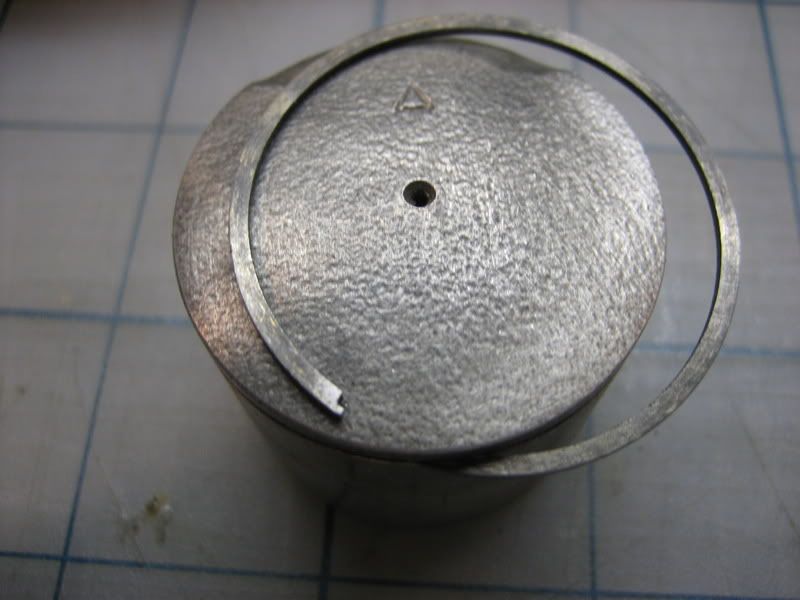
Once you have your old ring off the piston its time to check the end gap on the new one we do this by placing it in the cylinder,carefully squeeze the ring until it will drop in the cylinder(a little oil on the ring and cylinder will also aid in not scratching it for this step.
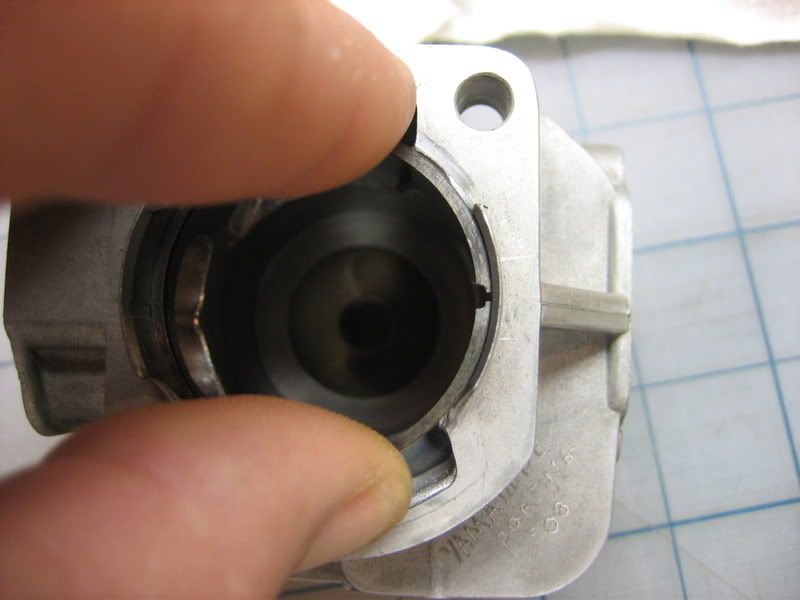
Now take your piston and push the ring in the cylinder about half way is good.This is to get the ring even in the cylinder for measurement.
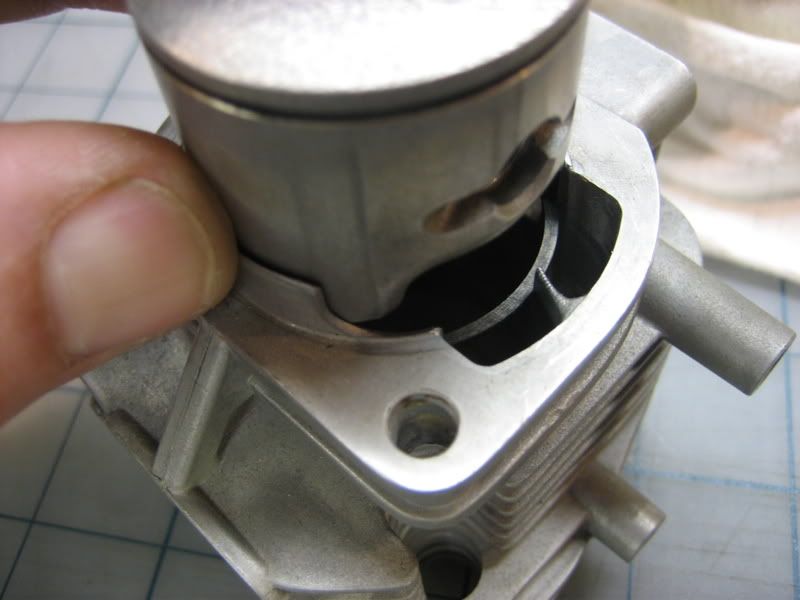
Now its very important to check your ring gap even if its brand new I have seen them range from fully closed to .08mm your looking for .04mm-.05mm for a new ring with the limit being .25mm for the old ring.
As you can see in this next pic this ones out a little far and was replaced.Also make sure your in the actual gap for the ring and not on the lip as shown in this pic as well.
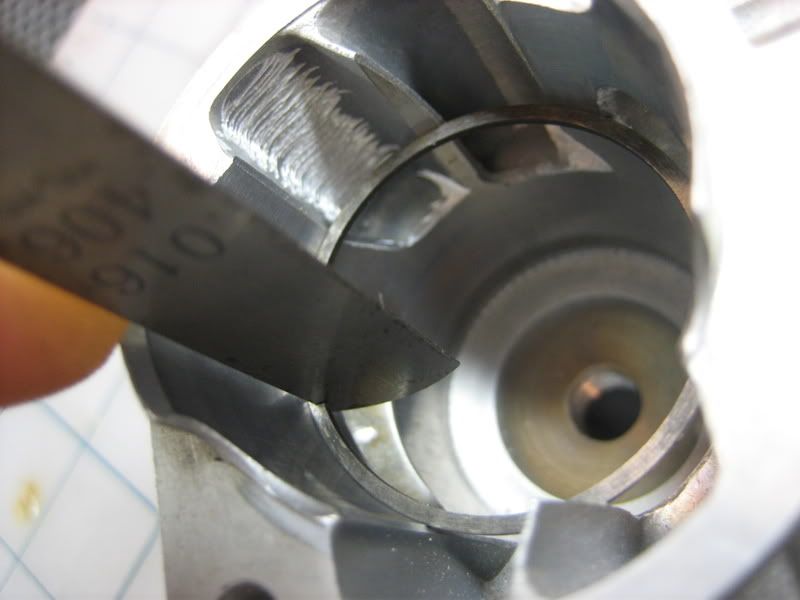
Now if the gap is to tight you may have to file the ends to get the correct gap(.04-.05mm) I do this with a very fine file then I round the edges with 800 grit wet sand paper. Another thing I like to check real quick is the ring width,most of them are fine(new) but I check them just to be sure. I don’t have a pic of that particular check but its as simple as checking its width which should be .78mm with the limit being .73mm for a 23cc (32mm) and .98mm and .93mm for the limit on a 26cc (34mm) and up to a 36mm ring.
Once you have checked all the measurements its time to get it back on the piston which I choose to also do by hand,starting by setting it on the top of the piston itself,Now it doesn’t matter which way is up unless your running a reed case engine modified by ESP in which case the ring is filed in areas at the ring gap that the 5th port coincides with.
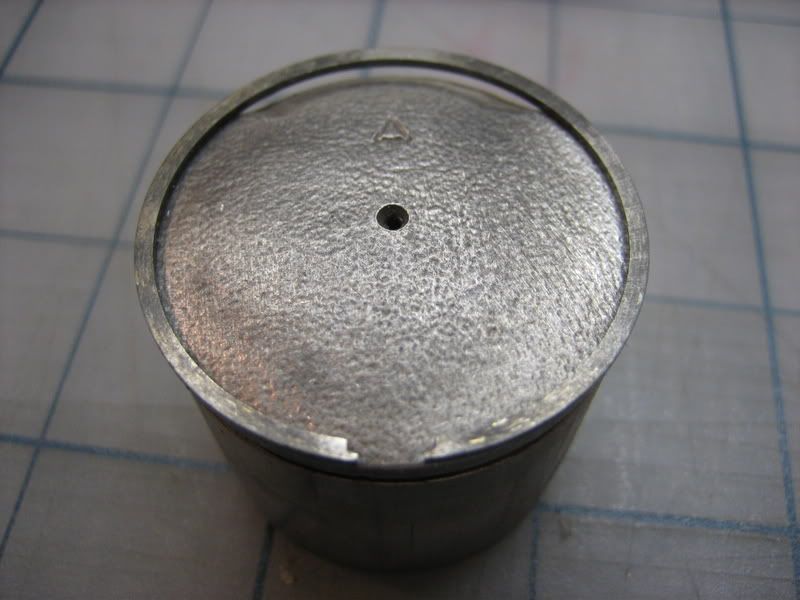
Now I just give a little push downward while pushing it apart to get the ring over the top.Be very careful not to scratch the piston in this step you can also pull the ring apart with your finger nails to help start it.
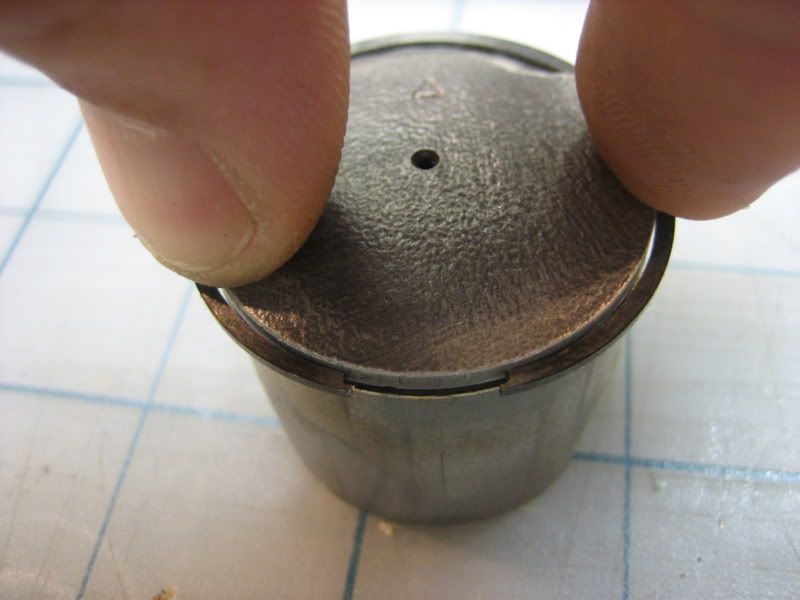
Once its over just push it in the ring groove.

Now that your new ring is on the piston you can install the head,Its very important that you pay attention in this step as shown in Ed’s vid to get the ring gap centered on the ring pin facing the intake side of the motor arrow or 0 facing the exhaust side.
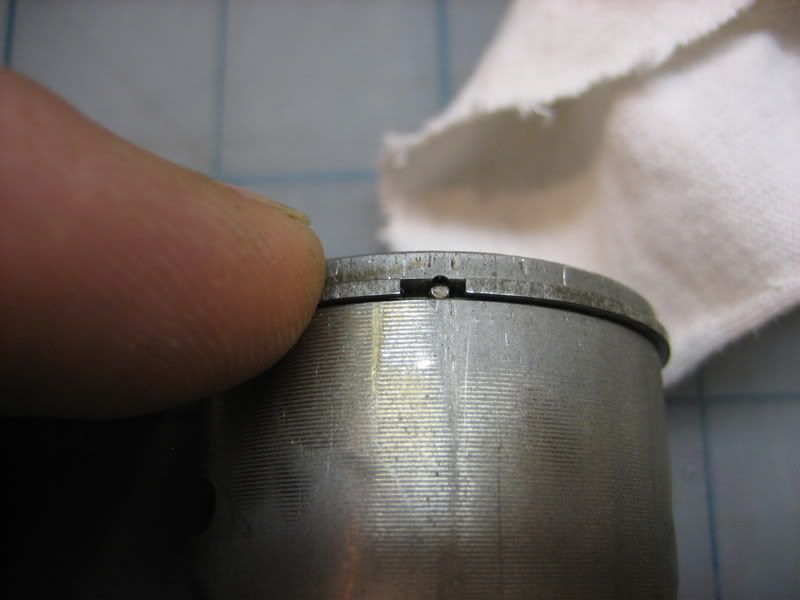
Holding the ring and piston in one hand and squeeze the ring on the piston making sure its still centered and start sliding it down on the piston,once it starts to go stop when you can see the ring in the intake track and double check its still centered on the pin.
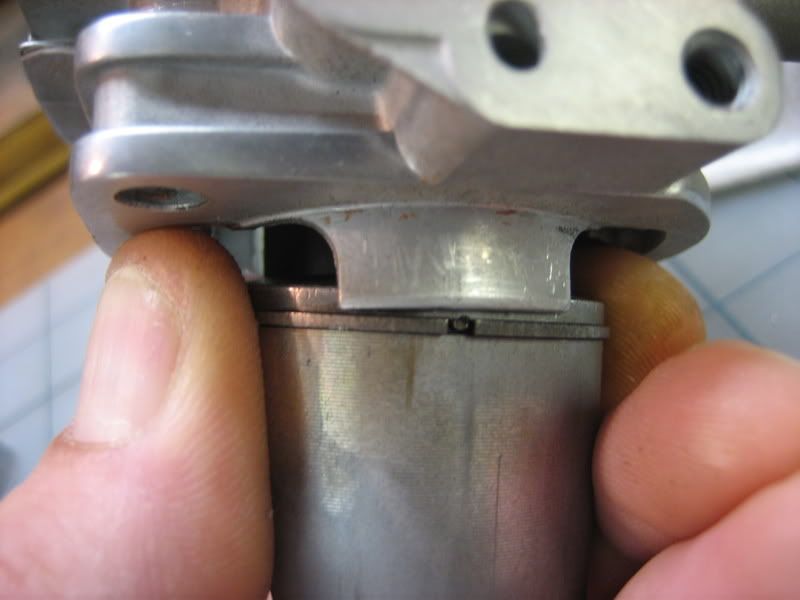
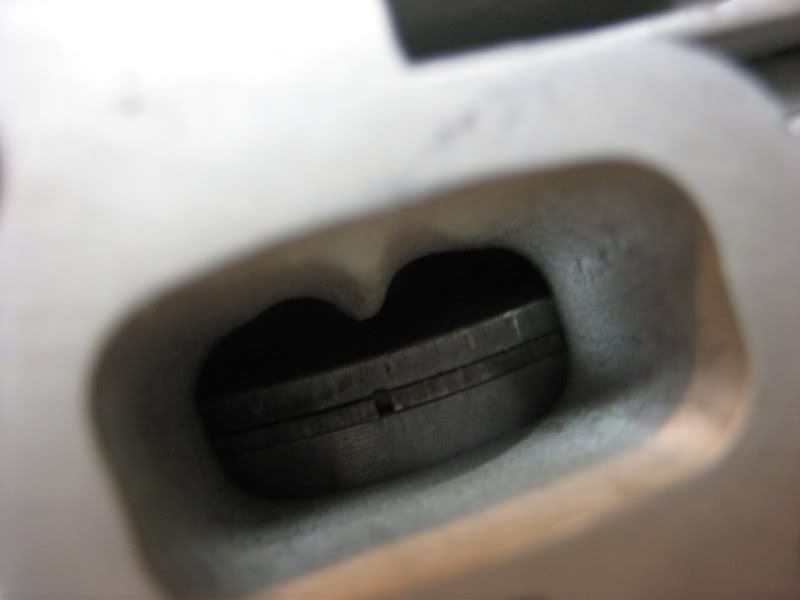
And thats it just follow the rest of the engine tutorial to wrap up your engine.
Yamadude Linkage Installation Tutorial.
January 30, 2009 by Baja Planet
Filed under Tutorials
The Yamadude linkage package is a great way to upgrade your Baja throttle and brake linkage. It contains everything needed to convert your linkage to a duel rod rather then a single at the servo. No more sticking and they are much more easily adjusted to just the way you want them.
I would like to thank Harley Dan for taking the time to create this tutorial and submit the .PDF file.
Dyeing Plastic R/C Parts with Rit Video Tutorial
January 30, 2009 by Baja Planet
Filed under Tutorials
These Two Videos will give you the basics an what you meed and how to do it.
Elcon Clutch: Building, installing and adjusting.
January 30, 2009 by Baja Planet
Filed under Tutorials
Comments Off on Elcon Clutch: Building, installing and adjusting.
Enjoy!
__________________
De-Anodizing parts the SAFE way.
January 30, 2009 by Baja Planet
Filed under Tutorials
A good friend of mine Dominic showed me this trick using Greased Lightning detergent. Its not nearly as toxic, no special masks for the fumes or gloves are needed, and it can be done indoors. It works just as well and is a great way to safely get rid of the anodizing.
Enjoy and I hope it helps.
Thanks for the great tips Dominic!
__________________
Installing an aftermarket servo such as the Rhino or Hitech
January 30, 2009 by Baja Planet
Filed under Tutorials
__________________
Installing The Turtle Racing HD Clutch System
January 30, 2009 by Baja Planet
Filed under Tutorials
Comments Off on Installing The Turtle Racing HD Clutch System
__________________
Manufacturer Listing
January 30, 2009 by Baja Planet
Filed under News
Comments Off on Manufacturer Listing
Place holder
DuneToberFest 2008 Photos
January 29, 2009 by Baja Planet
Filed under Baja Photos, Organized Bashing
Comments Off on DuneToberFest 2008 Photos


Baja Action Photos
January 29, 2009 by Baja Planet
Filed under Baja Photos
Comments Off on Baja Action Photos


Baja Photos by Travis Brock Photography
January 29, 2009 by Baja Planet
Filed under Baja Photos
Comments Off on Baja Photos by Travis Brock Photography


Installing the Turtle Racing Transmission Top Plate
January 28, 2009 by Baja Planet
Filed under Tutorials
Comments Off on Installing the Turtle Racing Transmission Top Plate
This tutorial will walk you through the main steps on the installation of the Turtle Racing transmission top plate and included top brake plate combination. Its fairly easy to install and should take around 30 minutes for a less experienced person and around 15 minutes if your used to working on your Baja. There are no tricky parts or major issues to notify you of. Quick and easy.
I will post a review on the part in a day or so.
The Plate will be available to the public shortly.
| YouTube – Installing the Turtle Racing Rear… | |
Building and bleeding the shocks for the Baja 5B & 5T
January 28, 2009 by Baja Planet
Filed under Tutorials
This tutorial covers building and bleeding of the shocks for the HPI Baja SS Only, not the RTR.
It has many tips and tricks along with an alternative setup for pistons and shock fluid.
| RCDocuments.com | |
Double the battery life of the DX3 Radio from Spektrum for under $20
January 28, 2009 by Baja Planet
Filed under Tutorials
Comments Off on Double the battery life of the DX3 Radio from Spektrum for under $20
I found this article posted on www.RCNitroTalk.com and thought I would pass it on.
Its not an easy mod but fore those that arent afraid to dig into your electronics, it doesn’t look that hard. It boils down to changing out an inefficient voltage regulator inside the TX with a more efficient one.
Link to the Mod….
http://www.instructables.com/id/SEK5UX7F03GBB2M/
Place to get the part
http://www.dimensionengineering.com/DE-SW033.htm
Have fun!

Building the Baja Transmission With Team FastEddy Bearings
January 28, 2009 by Baja Planet
Filed under Tutorials
The tutorial includes upgrading the bearings as well as installing the missing bearing.
Enjoy!
__________________
Installing the Turtle Racing Gear Plate
January 28, 2009 by Baja Planet
Filed under Tutorials
Comments Off on Installing the Turtle Racing Gear Plate
Yet another top shelf product by Dave at Turtle Racing.

__________________
Building a Baja Diff with the Turtle Racing Diff saver and Fast Eddy Bearings
January 28, 2009 by Baja Planet
Filed under Tutorials
Comments Off on Building a Baja Diff with the Turtle Racing Diff saver and Fast Eddy Bearings
This tutorial shows you how to convert your existing diff (RTR or SS) to us a Turtle Racing Diff Saver and installing the reinforced drive cups. It also shows the placement of the diff bushing to bearing upgrade using FastEddy bearings.
There are 3 SS parts compatibility issues using the SS Parts if you are doing a direct swap with an existing SS Diff.
All but one is included in the TR diff saver kit.
1- Need RTR washers on the inside of the diff. Need to get (1 set) HPI 87461
2- Need to use the RTR diff half gasket that comes with the TR diff saver. (The SS case gasket is larger)
3- Need to use the 4 case screws that come with The TR Diff saver. (SS screws are shorter.)
Building the SS Diff With Team FastEddy Bearings
January 28, 2009 by Baja Planet
Filed under Tutorials
Comments Off on Building the SS Diff With Team FastEddy Bearings
This tutorial covers building the Baja SS diff.
It also covers installing bearings to replace the bushings on the inside of the diff.
| RCDocuments.com | |
Remove the play in your spurr gear.
January 26, 2009 by Baja Planet
Filed under Tips & Tricks
Comments Off on Remove the play in your spurr gear.
Use FastEddy Clutch/Wheel bearing shim kit to eliminate any side play of the spur gear.
Place the proper amount of shims behind you spurr to remove the front to back play. (same as shimming front axe, or clutch bell)
Submitted by:
franky
To submit a “Quick Tip” Please visit:
HPIBajaTutorials.com
Help prevent tire cuts and tears.
January 26, 2009 by Baja Planet
Filed under Tips & Tricks
Comments Off on Help prevent tire cuts and tears.
Sand the sharp edges of the wheel and bead rings in any areas that contact the rubber of the tire. This will help prevent cuts and tears and will ensure you get the longest life from your purchase.
Submitted by:
Hostile Racing Products
To submit a “Quick Tip” Please visit:
HPIBajaTutorials.com
Prevent your Baja brakes from dragging.
January 26, 2009 by Baja Planet
Filed under Tips & Tricks
Comments Off on Prevent your Baja brakes from dragging.
To prevent brake drag, take the spring out of a click actuated writing pen, cut it into three equal pieces, and install one on each of the two brake shaft pins as shown below (3rd piece not needed but put it in your tool box in case you loose one):
Submitted by:
HarleyDan
To submit a “Quick Tip” Please visit:
HPIBajaTutorials.com
Better Braking on your Baja
January 26, 2009 by Baja Planet
Filed under Tips & Tricks
The best way to get better brakes is to use fuel tubing instead of the spring that come stock on the Baja Linkage. Replace the spring with fuel tubing and you will instantly better brakes.
Submitted by:
CrazyAce63
To submit a “Quick Tip” Please visit:
HPIBajaTutorials.com
Make servicing the air filter much easier
January 26, 2009 by Baja Planet
Filed under F.A.Qs
Comments Off on Make servicing the air filter much easier
To make servicing the air filter much easier, install a quick release cage mechanism. There are severl different mods or cage releases you can use.
Submitted by:
HarleyDan
To submit a “Quick Tip” Please visit:
HPIBajaTutorials.com
Build a better shock.
January 26, 2009 by Baja Planet
Filed under Tips & Tricks
Comments Off on Build a better shock.
To help the seals on your shocks work better use Green Slime on the o-rings and shafts when you are putting your shocks together you are less likely to have any leaks this way. This will also help you from tearing an o-ring with the threads on your shock shaft.
Submitted by:
voltmeter101
To submit a “Quick Tip” Please visit:
HPIBajaTutorials.com
Easily remove exhaust bolts.
January 26, 2009 by Baja Planet
Filed under Tips & Tricks
Comments Off on Easily remove exhaust bolts.

Submitted by:
GlockZilla
To submit a “Quick Tip” Please visit:
HPIBajaTutorials.com
Keep screws from vibrating out.
January 26, 2009 by Baja Planet
Filed under Tips & Tricks
Comments Off on Keep screws from vibrating out.
Use fuel tubing on the screws that come through the rear of shock braces to keep from vibrating out.
I have used both loctites but this works better.
NEVER vibrated out on me with this setup..
Submitted by:
Animal454
To submit a “Quick Tip” Please visit:
HPIBajaTutorials.com
Removing a tight wheel nut.
January 26, 2009 by Baja Planet
Filed under Tips & Tricks
Comments Off on Removing a tight wheel nut.
One easy way to remove a tight wheel nut is ,
Have the Baja on the ground, rest your left knee (if right handed) on the wheel/tire and use both hands on the wheel wrench.
Submitted by:
IIlusionSS
To submit a “Quick Tip” Please visit:
HPIBajaTutorials.com
Quickly remove you Elcon or Lauterbach clutch
January 26, 2009 by Baja Planet
Filed under Tips & Tricks
A quick and easy way to remove you elcon or lauterbach clutch. all you need is a piston lock, a pair of needle nose pliers, and a screwdriver.
These clutches use the taper to lock onto the crankshaft. To remove them follow these simple steps.
- Remove the spark plug and install the piston stopper
- Insert the tips of the neddle nose pliers into a pair of the holes directly opposite from each other on the face of the clutch. You can do this on both clutches
- Insert a screwdriver between the plier tips and use it as a lever
- Wrench on the screwdriver. All you need to do is break the taper lock. After you do that the clutch falls off.
This is a quick and dirty way to remove these clutches. On the elcon clutch be careful not to tweak the thin cover plate with the tips of the pliers.
Submitted by:
Brice Arnold
To submit a “Quick Tip” Please visit:
HPIBajaTutorials.com
Replace that pesky carburetor linkage screw.
January 26, 2009 by Baja Planet
Filed under Tips & Tricks
The Phillips head screw that is used to hold the linkage to the carb is a pain in the butt get in and out.
You can replace this screw with a bead lock screw.
Depending on what carb you have, you may need to use a little washer if the screw is to long.
Now its a alen head and will stay on your driver so you can easily get it in and out.
No more worries about striping the head out either.
Submitted by:
FastEddy
To submit a “Quick Tip” Please visit:
HPIBajaTutorials.com
Why glue and tape my foam inserts and tires?
January 24, 2009 by Baja Planet
Filed under F.A.Qs
There are more ways to do this then there are people doing it as well as ways no one has thought of yet. Yes, there is so much information out there that its confusing. Lets back up a step and look at the issues involved so you can make an informed decision on how to move forward.
Attaching the foams to the wheels:
Centrifugal force causes the foam to expand. The foam inserts act like air in a car tire to keep the tire on the road as well as giving the tire a cushion when pressed on. As the wheel turns faster the foams will expand changing the properties to be different then they were intended to be. Attaching the foams to the tire will help to eliminate half this problem. The other issue is having the foams move around inside the tire rotating and causing them to wear much quicker.
Attaching the foams to the wheel can be achieved in several ways. I use a rubberized CA glue designed to mount tires to wheels in the RC industry. There are many different glues available. Look at the properties of the glue and pick one. You mentioned Velcro, Hmm… haven’t heard of this one yet but I dont see why it woudnt work as long as there is enough to keep the entire foam secure to the wheel and that the glue on the velcro stayed attached to the foam. Only issue I see is what a pain in the ass its going to be to get them on strait.
Second foam issue is that once attached to the wheel the foam itself can expand during use and tear itself apart. For this people will use tape around the outside of the foam to help hold it together and to keep it from expanding. Choosing a good tape is the secret. You need a tape that will not easily stretch. A GOOD quality duct tale or strapping tape is what seems to work best. This is tape that had strings in it to help it from stretching while its under a load. I like to get a 3-4 inch wide tape that will cove most of the foam at one time rather then using 2 thinner strips however either will work.
Ballooning tires:
This is also an issue. the centrifugal force causes the tire to get larger as they turn faster. This can cause several issues one of them being that they can pull the lugs out of the bead locks. It can be addressed the same as the foam by taping the inside of the tire much the same as we did the outside of the foams.
Beads pulling out of the bead locks:
Once you have minimized the the tire and foam expansion this will also minimize the chances of the beads pulling out of the locks. Now we need to look at other reasons this may happen. The tile is held in by a bead lock that captures the tire mounting lugs in between the wheel and the lock. Anything other then a tight lock will give the opportunity for the bead to pull out. When assembling the bead locks its important to make sure that you tighten the screws down properly but to not over tighten them. The screws will easily strip out the plastic and allow for them to pull out. Its a delicate balance to get them tight but not to damage the wheels.Take your time, look and feel whats going on and you will be fine. Another fix for this is to get longer screws for the fronts and to put a nut on the inside. If your after a more permanent solution you can use the rubberized tire glue and glue the bead lugs onto the wheels then glue the bead locks onto the wheel sandwiching them followed up with the screws or screws and nuts.
How do I un-flood my engine?
January 21, 2009 by Baja Planet
Filed under F.A.Qs
Comments Off on How do I un-flood my engine?
The easiest and fastest way is to do the following:
- Remove the spark plug
- Turn your Baja upside down.
- While its upside down, pull the starter cord several times. (10-20)
- Turn your Baja back over
- Wipe off the wet tip of the spark plug
- Re-install the spark plug.
You will want to do this in an open and properly ventilated place. There may be a good amount of fuel in the engine and it will come out with force when you pull the starter cord. We recommend that you use protective gear such as eye and skin protection. Do not look down the spark plug hole while pulling the starter cord.
If you would like more information or to ask question about this topic, please visit our forum.
www.HPIBajaTurorials.com
Why do I keep burning out my throttle servo?
January 21, 2009 by Baja Planet
Filed under F.A.Qs
The Baja stock radio has a built in failsafe. What this does is to apply the brake when the radio signal is lost. If you have burned out your throttle servo on more than one occasion chances are that you have turned off your transmitter and did nit turn off the power switch on your Baja or that you are not powering on and off in the proper sequence.
The proper power ON procedure is as follows:
- Turn your Transmitter first. Wait 5-10 seconds.
- Turn on the power switch located on your Baja
The proper power OFF procedure is as follows:
- Turn OFF the power switch located on your Baja
- Turn OFF your Transmitter power.
If you would like more information or to ask question about this topic, please visit our forum.
www.HPIBajaTurorials.com
What is the proper fuel to oil mixtire?
January 21, 2009 by Baja Planet
Filed under F.A.Qs
Comments Off on What is the proper fuel to oil mixtire?
This is a controversial topic. Depending on who you ask, you will get several different answers.
HPI recommends a fuel to oil ratio of:
- 25:1 (25 units of fuel to 1 unit of oil.)
This is a great place to start. Using the HPI oil that comes with your Baja mixed at 25:1 will keep you safe. It’s recommended that you use this for the first gallon of fuel during the engine break-in process.
After the first gallon, if you’re confident in your tuning skills you should be fine by leaning out your oil and running 32:1. If you decide to use synthetic oil after the break-in period, 32:1 seems to be a good mixture.
If you would like more information or to ask question about this topic, please visit our forum.
www.HPIBajaTurorials.com
What octane fuel should I use?
January 21, 2009 by Baja Planet
Filed under F.A.Qs
Comments Off on What octane fuel should I use?
Octane ratings on gasoline vary depending on where you live. Each country will measure it differently.
HPI recommends using a gasoline with the octane rating of:
- (US) 87-93
- (Europe-Asia) 92-98
Most people will find this at their gas pump marked as “Regular”. If this is not available, a “Premium” or “High Test” can be used without harming your engine. There is no need nor will you get better performance by using a higher octane rated fuel in your stock CY engine.
If you would like more information or to ask question about this topic, please visit our forum.
www.HPIBajaTurorials.com


